Have you ever wanted to make your own Greek yogurt? I’ve made this recipe countless times, and you can, too. Just follow the easy directions and enjoy thick, creamy homemade Greek yogurt any time you like.
I first published this recipe on March 6, 2011. Hundreds of readers added comments and questions over the years, so now I’ve updated the post with new photos and more information.
Back in 2011 a blog was often like an online diary, but these days most readers want the information presented quickly and concisely. “We don’t want to read your life story!” they say, so I’ve removed my original scintillating intro about tasting FAGE Greek yogurt for the first time at my aunt’s home.
There’s even a “jump to recipe” button at the top of the post now, so you can skip the step by step tutorial if you wish and go straight to the printable recipe card. What a time to be alive!
Shall we make some delicious homemade Greek yogurt?

This post may contain affiliate links. Please read our disclosure policy.
Why You’ll Love This Recipe
Amazing Flavor and Texture: Thick, creamy Greek yogurt compares to regular yogurt like a home-grown tomato compares to a February grocery store tomato; it tastes a kazillion times better!
Economical: If you eat a lot of Greek yogurt like I do (almost every morning), the cost can add up. Making your own yogurt from scratch is easy and saves money!
All Natural: You’ll have total control over the ingredients, so you can avoid the additives in store-bought yogurt and make a very pure product.
Ingredients Notes
You only need two simple ingredients to make 48 ounces of your own fantastic, creamy, thickened yogurt:
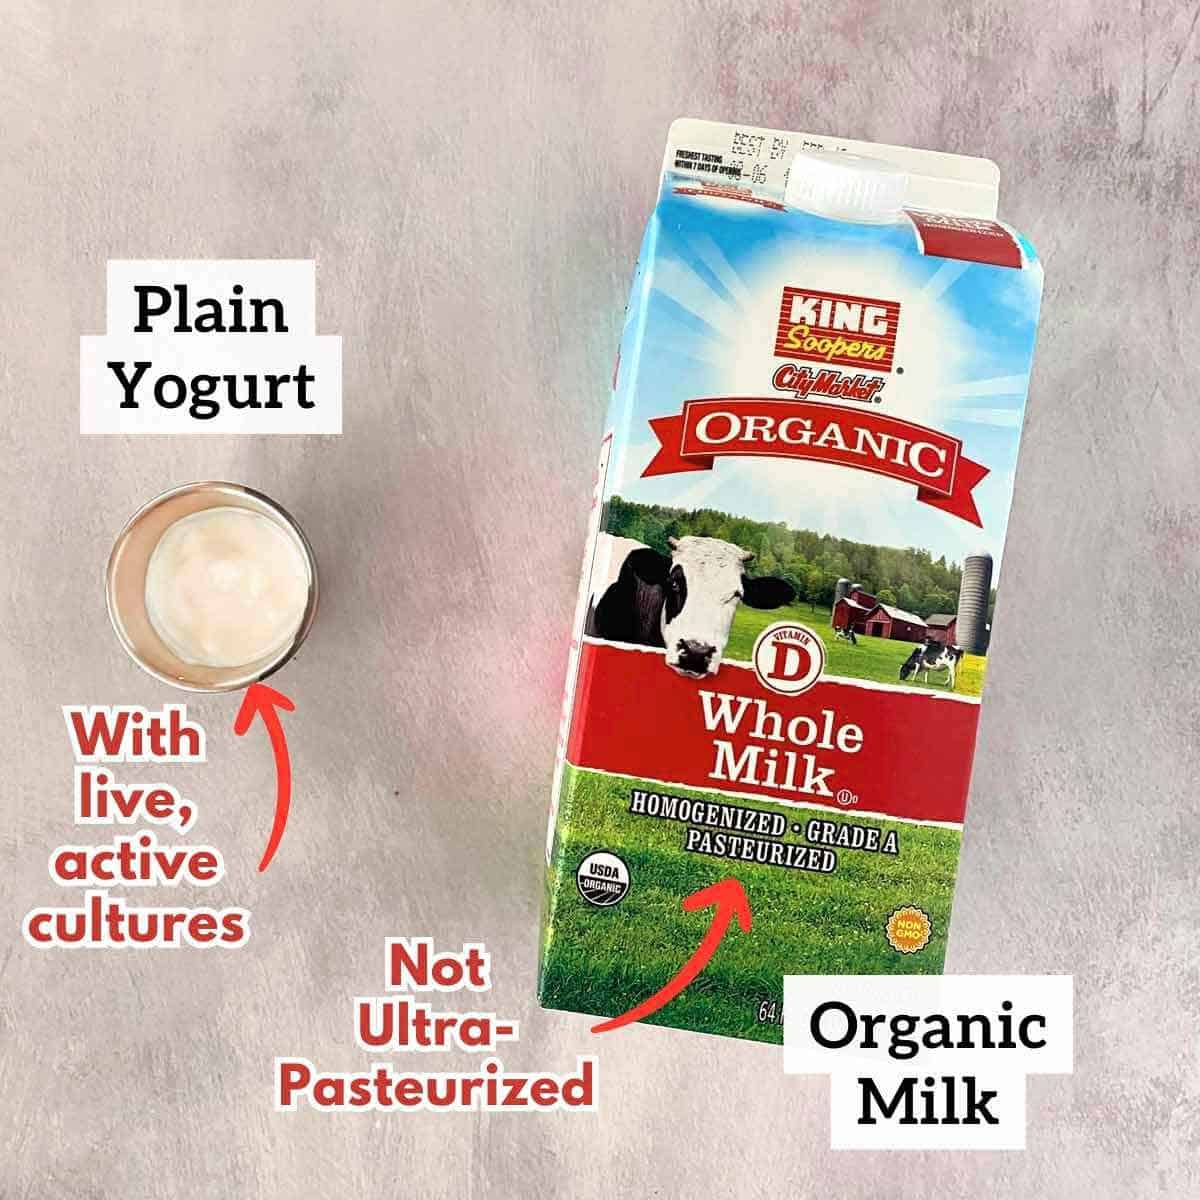
1/2 gallon milk – fat content of your choice. I generally use organic whole milk or 2% milk. The higher the fat content in the milk you use, the creamier your yogurt will be.
Note: I prefer to prepare this recipe with organic milk, which is produced without any synthetic chemicals, hormones or antibiotics. (Antibiotics may interfere with the yogurt-making process.)
Make sure you use regular pasteurized milk instead of ultra-pasteurized. Why? Ultra-pasteurized milk is briefly heated at a high temperature that can kill the live cultures in the milk.
2 to 3 tablespoons plain prepared yogurt (make sure it contains live, active cultures)
Note: After making your first batch, you can simply save a couple tablespoons of your homemade yogurt to start the next batch. I love that this process becomes indefinitely sustainable!
Money Saving Tip
If your grocery story has a bargain section in the dairy case, check for organic milk that is nearing its expiration date.
This milk is perfect for yogurt making, and is often sold at a discount.
Cooking Equipment
Here’s what you’ll need to prepare this homemade Greek yogurt recipe:
- Cooking thermometer – either a candy thermometer or an instant-read thermometer work best
- Large mesh strainer
- Mixing bowl that the strainer fits inside, so the yogurt can drain
- Cheesecloth to fit 4 layers when draped over the strainer
Step by Step Directions
To make regular yogurt without a yogurt maker, I’ve always followed the basic recipe in the Joy of Cooking cookbook.
The finished yogurt is then strained through cheesecloth for a few hours to release extra whey and liquids and transform into creamy Greek yogurt. Here’s the process:
STEP ONE: To begin, pour 2 tablespoons of the milk in a small bowl and reserve.
STEP TWO: Pour the rest of the milk into a double boiler or heavy-bottomed pan and turn the heat to medium. If using a double boiler, cover the milk. If the pot is directly on the burner, stir it and watch it very, very carefully so you don’t burn the bottom.

STEP THREE: Heat the milk to 180 degrees F. It helps to clip a candy thermometer to the side of the pan so you can carefully watch the temperature as it rises. Or you can check frequently with an instant read thermometer.
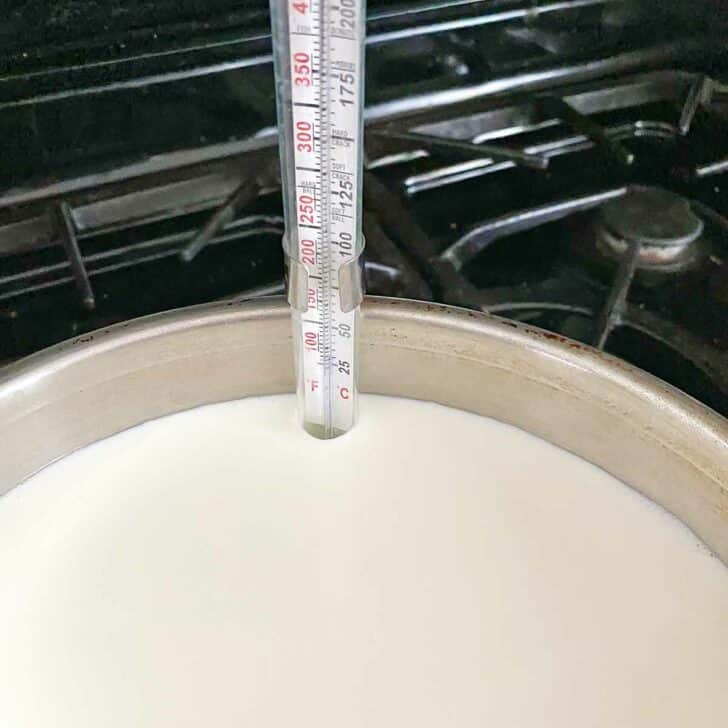

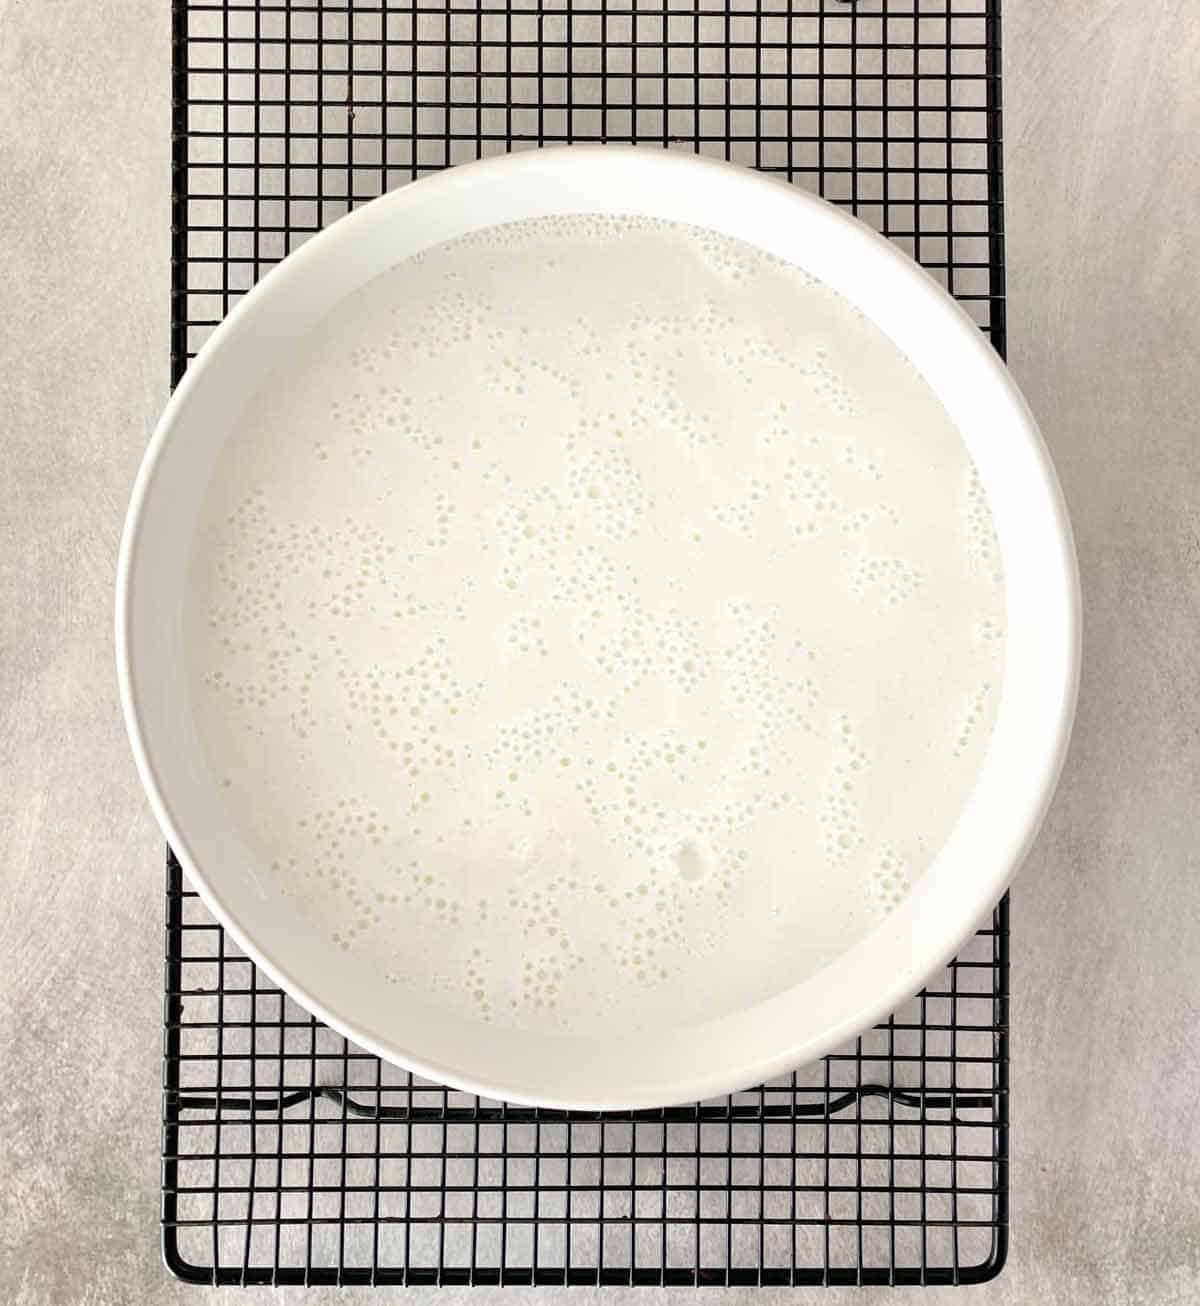
STEP FOUR: As soon as the temperature reaches 180 degrees, F, immediately remove the pot from the stove. Pour the milk through a wire mesh strainer into a 3 quart baking dish and leave it uncovered.
Put the dish on a cooling rack at room temperature, and let the milk cool to between 105 and 110 degrees F. Stir it a few times during the cooling process to prevent a “skin” from forming on top of the milk.
In our kitchen, this took about 50 minutes. (Note: remember to leave the dish completely uncovered at this stage, so the good bacteria from the air can start working their magic!)
STEP FIVE: While you’re waiting for the milk to cool, turn on your oven to the “warm” or “proof” setting. If your oven doesn’t have that setting, turn it to 150 degrees F.
STEP SIX: Combine the 2 tablespoons of milk you saved with 2 1/2 tablespoons prepared yogurt in a small bowl and reserve.
PRO TIP: Resist the temptation to add more than 3 tablespoons yogurt. According to the Joy of Cooking, “you may wonder why so little starter is used and think that a little more will give a better result. It won’t. The bacillus, if crowded, gives a sour, watery product.”
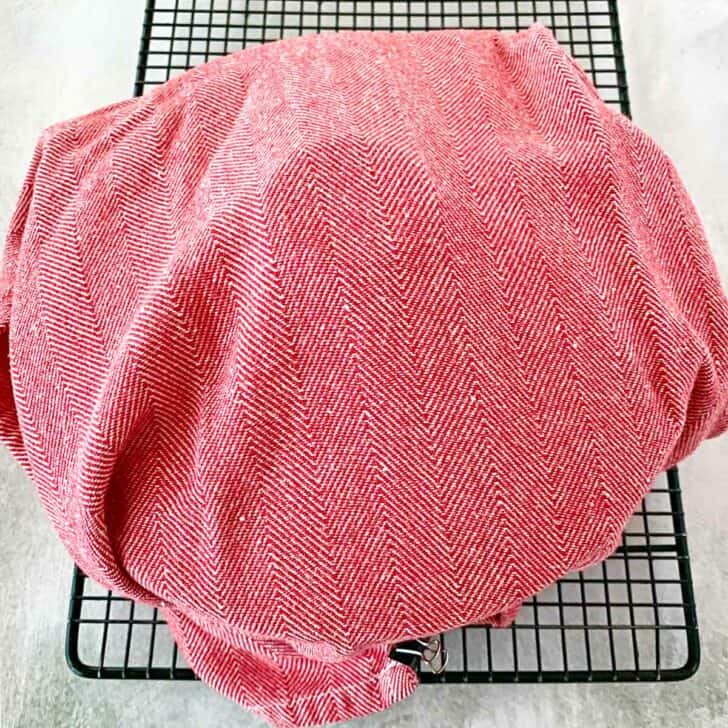
STEP SEVEN: Once the milk has cooled to between 105 and 110 degrees, add the yogurt-milk mixture and stir well to combine. (Don’t forget this important step.) Put the lid on the casserole dish and cover it with a dishtowel to help insulate it from temperature fluctuations.
STEP EIGHT: Turn your oven off, but now turn the oven light on. Just the light from the oven should keep the dish warm enough to enable the yogurt-making process.
Put the towel-covered dish in the oven, making sure that the towel isn’t touching the oven lightbulb, and leave the oven light on.
Note: If your oven light doesn’t emit any heat, you can alternately put the towel-covered dish on a heating pad set on “low,” or put it in a cooler with a snug-fitting lid and several sealed jars of hot water to maintain the heat.
Leave the yogurt undisturbed for 7 or 8 hours, or overnight.
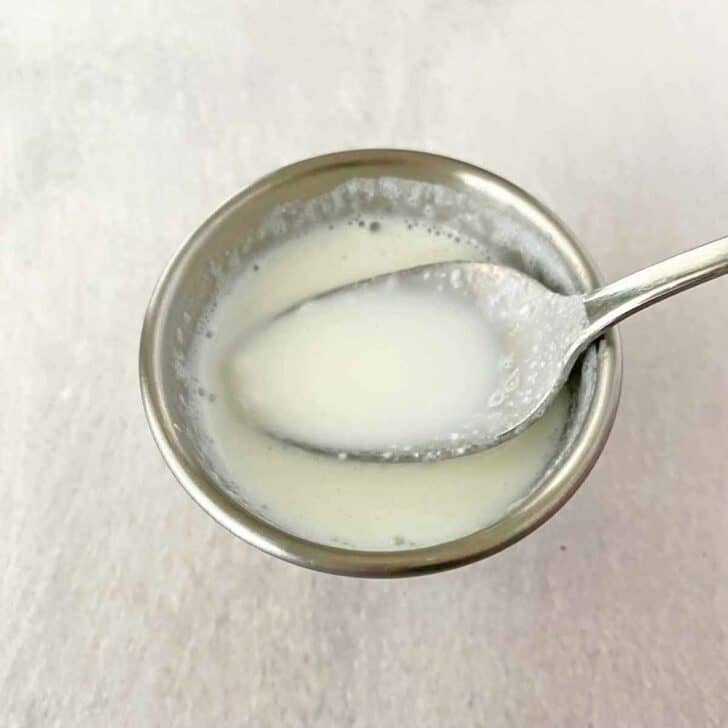
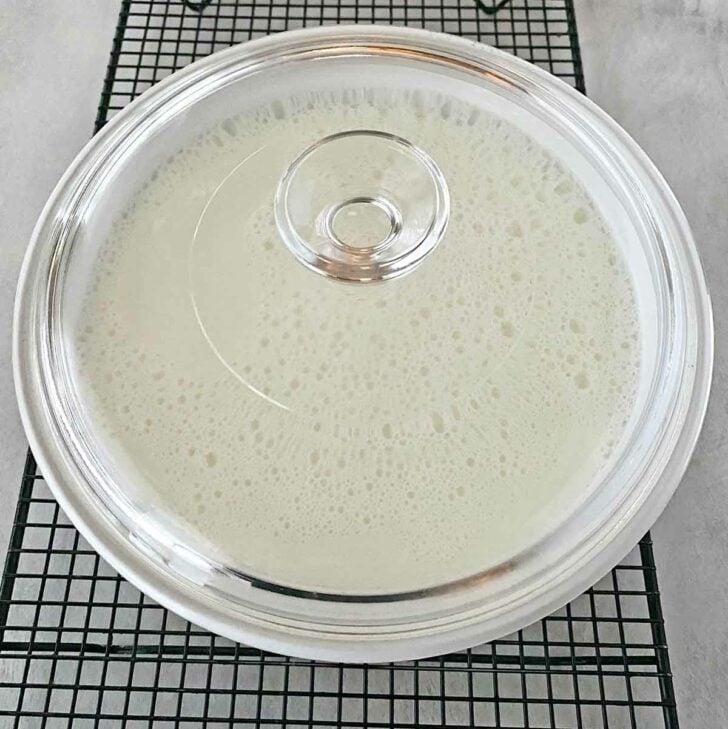
STEP NINE: In the morning, carefully take the dish out, unwrap it and remove the lid, and check to see whether the milk has turned to yogurt. After ten hours, this is how our yogurt looked:
If your batch isn’t quite thickened, return it to the oven and check on it again in an hour. Once the yogurt is sufficiently thickened, you can stop at this stage if you want regular yogurt. Just stir the mixture and refrigerate it; you may need to pour off a little of the watery liquid. Don’t forget to turn off the light in your oven!
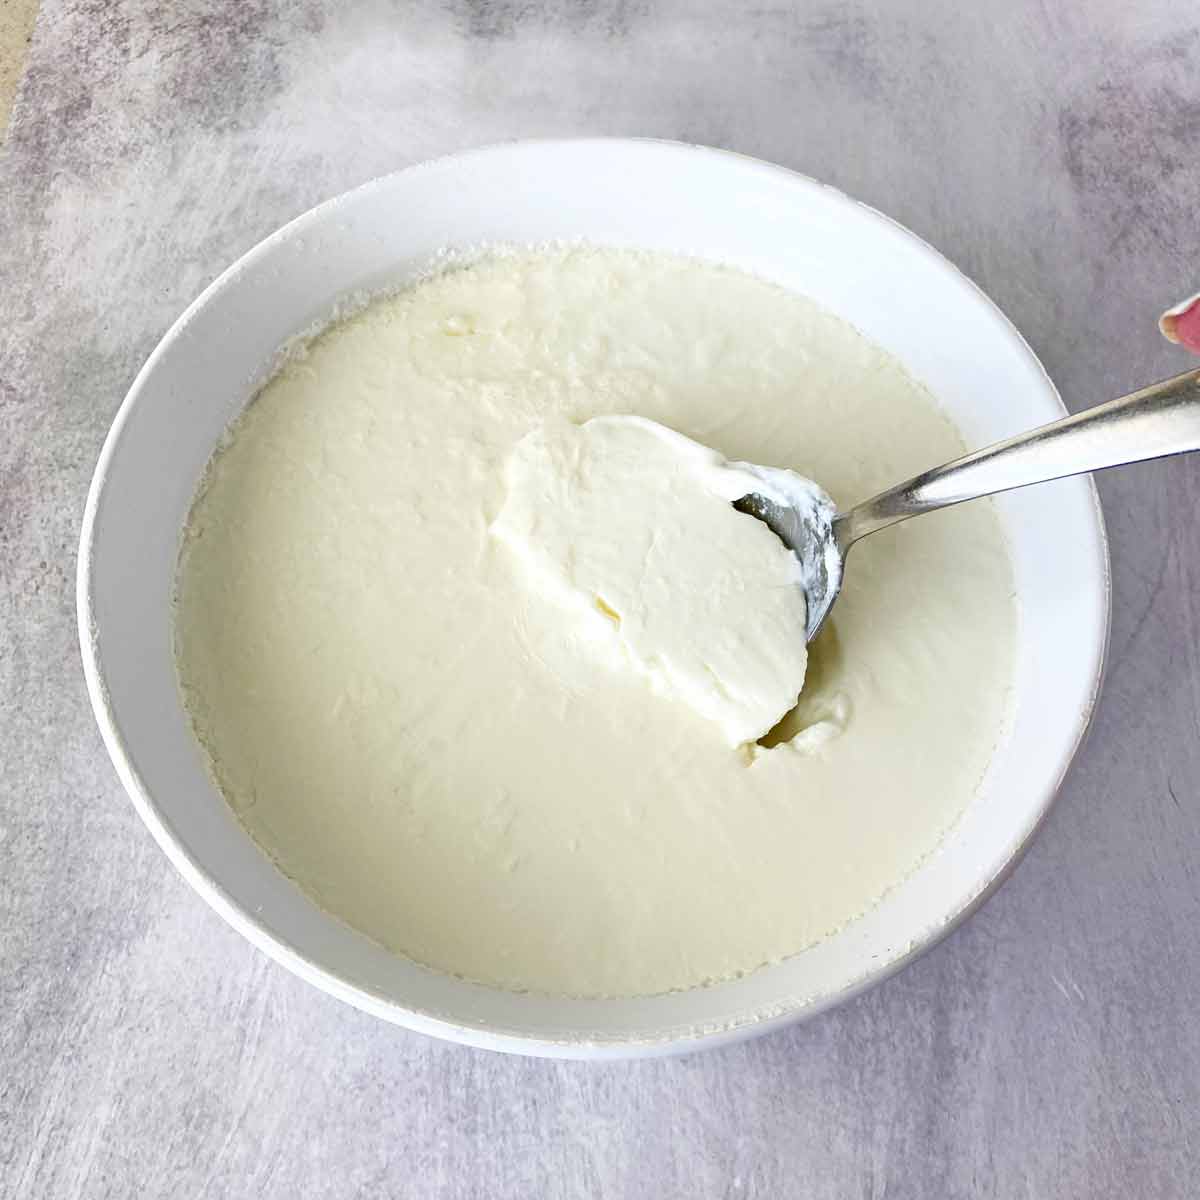
STEP TEN: For creamy Greek yogurt, refrigerate the yogurt in the covered dish for at least three hours to allow it to completely cool and thicken.
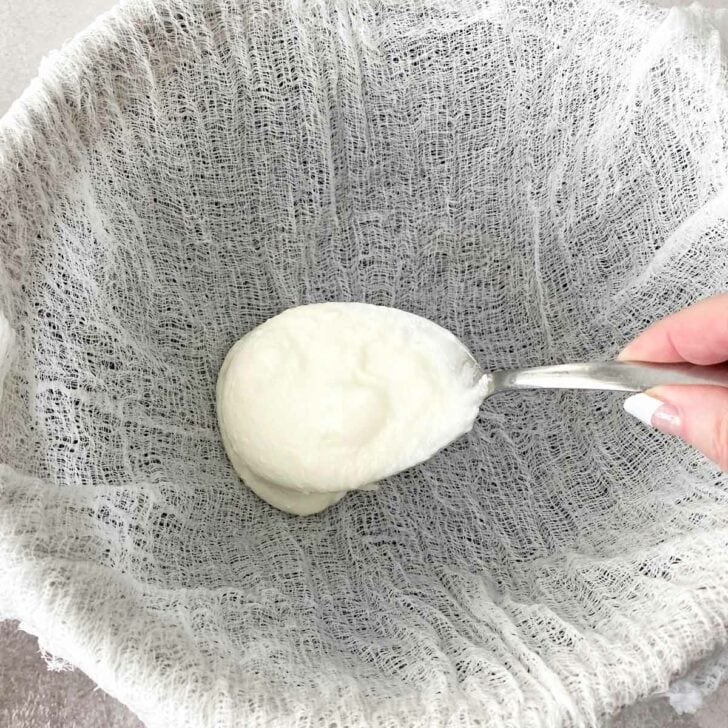
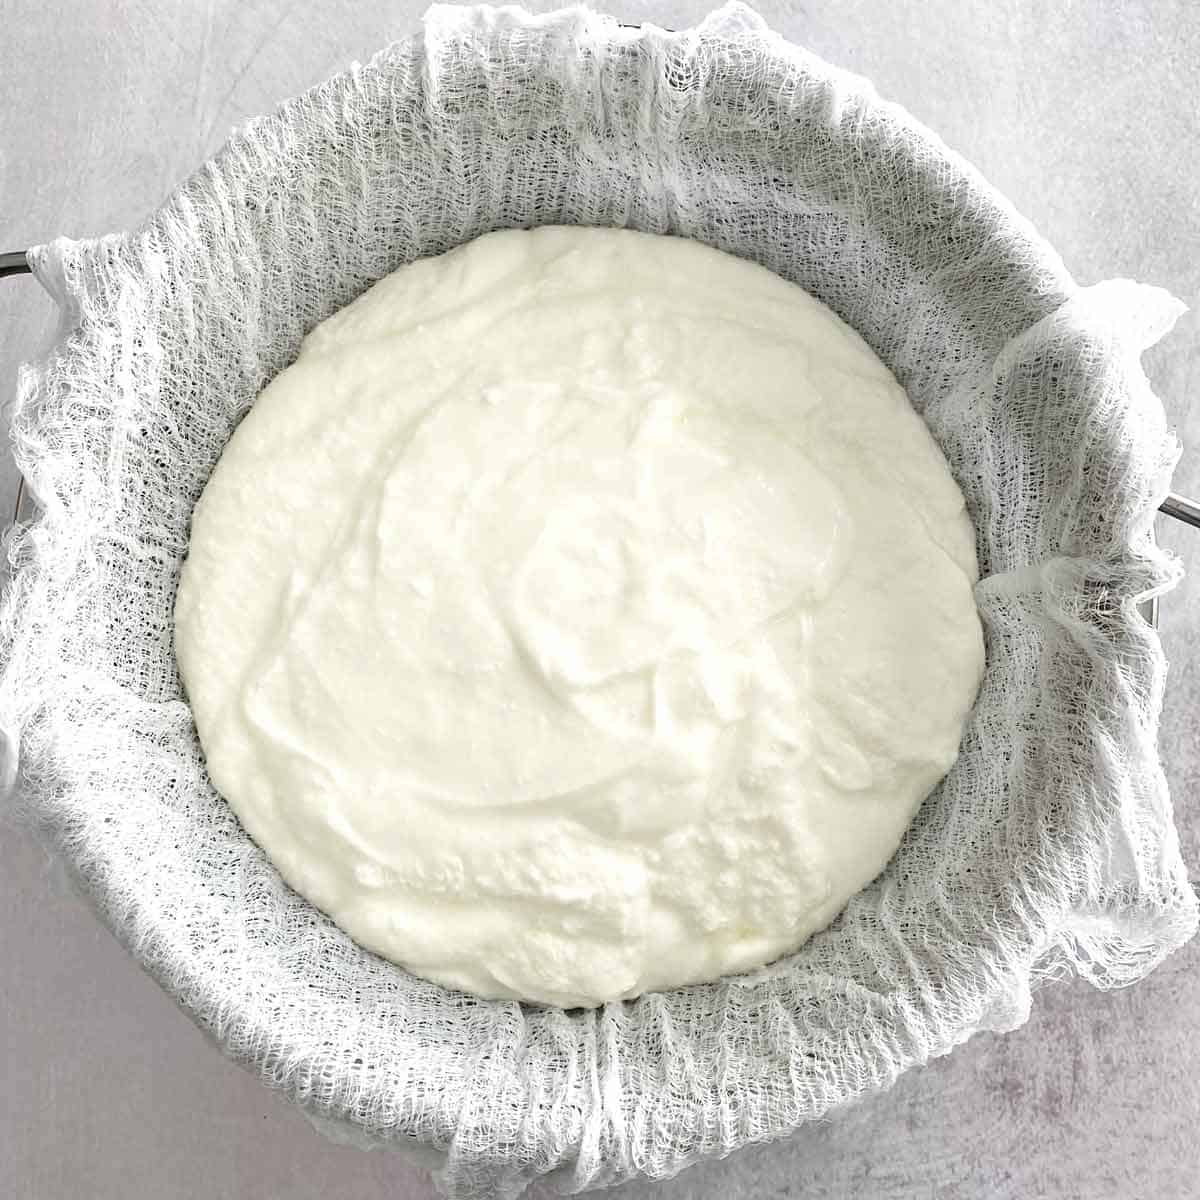
Meanwhile, line a large strainer with four layers of damp cheesecloth and find a bowl that the strainer will fit inside:

STEP ELEVEN: Put the strainer inside the large bowl, and spoon in all the yogurt to start the straining process.
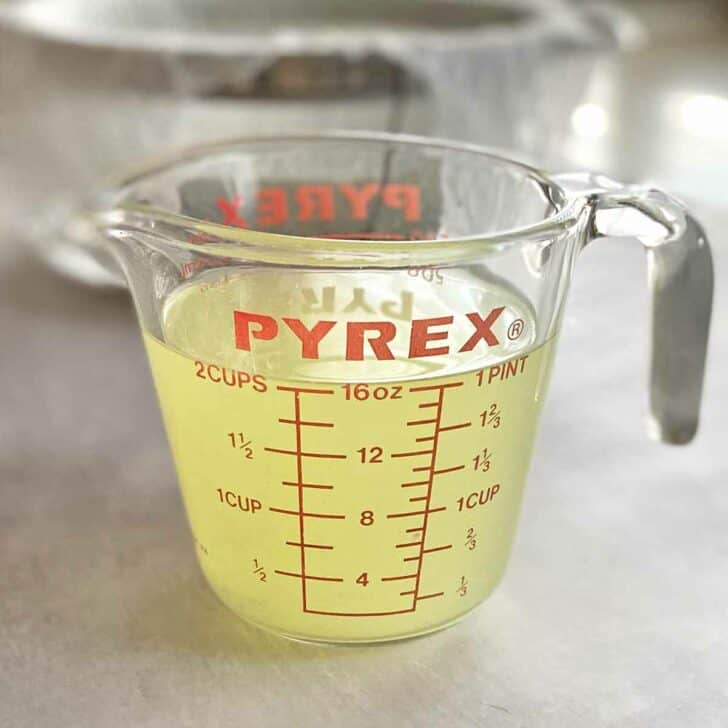
Refrigerate for one hour. Pour out the liquid that has accumulated in the bottom of the bowl. This is the whey—that’s right, the very same delicacy Little Miss Muffet ate while she was sitting on her tuffet.
You can save the whey and use it for cooking or baking (like this yummy Whey Sourdough Bread).
Return the bowl to the refrigerator for one more hour, and strain the liquid again. Our batch drained off about two cups of whey, but you may have more or less and that’s fine.
The yogurt should now look thick and creamy:
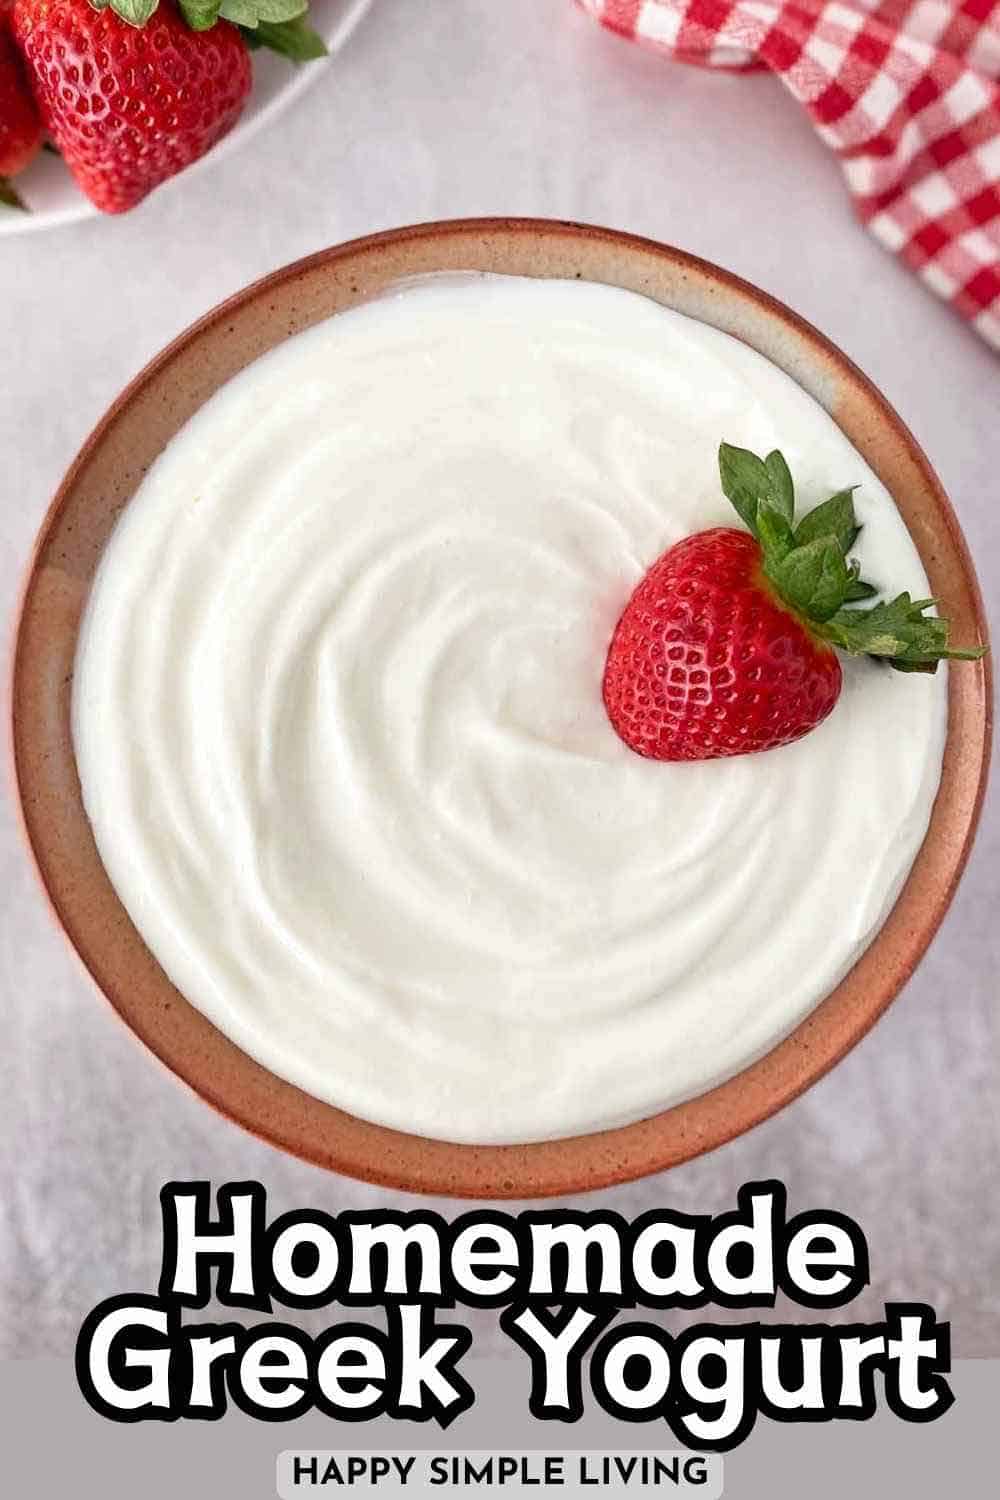
STEP TWELVE: It’s ready to serve! Transfer it to a bowl and stir it for a minute or two to smooth the thick yogurt before serving. Or spoon it into a container and refrigerate it, tightly covered, for up to a week. Makes about 6 cups, or 8 6-ounce servings.

Serving Suggestions
You can enjoy the Greek yoghurt as is, or top it with:
Remember to save a couple of tablespoons of your homemade yogurt so you can use it as starter for the next batch!
Other Ways to Use Greek Yogurt
- Use it in place of sour cream in your favorite dip recipe.
- Make Tzatziki Sauce, the sauce/dip that’s popular with gyros and in Mediterranean cuisine.
- Spoon it over a baked potato.
- Blend it into a breakfast smoothie.
- Make yogurt popsicles!
Troubleshooting: If Your Homemade Greek Yogurt Doesn’t Thicken
After many successful batches of homemade yogurt, I recently had a big FAIL. The only thing I’d done differently was to use our smaller, upper oven to incubate the yogurt instead of the lower oven I usually use.
When I pulled the yogurt out the next morning it hadn’t thickened at all; it was simply a big bowl of warm milk. I was so disappointed! At first I suspected the milk, because I’d used the big-name brand of organic milk that is known to be ultra-pasteurized. But when I measured the temperature of the milk, it was 130 degrees – too hot.
I decided to experiment with the failed batch, and let the milk cool back to 110 degrees. Then I added 2 more tablespoons of yogurt mixed with 1 tablespoon of milk. (My thinking was that the too-high temperature had killed the live cultures from the previously-added yogurt.)
I wrapped the bowl in a towel, put it in the lower oven with the oven light on, and let it rest for 8 hours.
When I opened the lid, I was amazed to see that the batch was thick and creamy. In fact, it was one of the thickest batches I’ve ever made. The consistency was slightly sticky, but after I strained the yogurt it was fine.
So if you ever have a batch that fails, you may want to try again and try to find the right spot where you can keep the yogurt at that ideal temperature of about 110 degrees F.
Printable Recipe Card
If you enjoy this recipe, click on the stars ⭐️⭐️⭐️⭐️⭐️ below to leave a rating! It helps us so much, and we love reading your comments, too!

Homemade Greek Yogurt
Equipment
- Candy thermometer
- Large mesh strainer
- Large mixing bowl
- Cheesecloth
- 3-quart casserole dish
- cooling rack
- Large dishtowel
Ingredients
- 1/2 gallon whole organic milk
- 2 1/2 tablespoons plain yogurt with active cultures
Instructions
- Pour 2 tablespoons of the milk in a small bowl and reserve.
- Pour the rest of the milk into a double boiler or heavy-bottomed pan and turn the heat to medium. If using a double boiler, cover the milk. If the pot is directly on the burner, stir it and watch it very, very carefully so you don’t burn the bottom.
- Heat the milk to 180 degrees F. It helps to clip a candy thermometer to the side of the pan so you can carefully watch the temperature as it rises. Or you can check frequently with an instant read thermometer.
- As soon as the temperature reaches 180 degrees, F, immediately remove the pot from the stove. Pour the milk through a wire mesh strainer into a 3 quart baking dish and leave it uncovered. Let the milk cool to between 105 and 110 degrees F, stirring a few times during the cooling process to prevent a “skin” from forming on top of the milk.
- Turn on your oven to the “warm” or “proof” setting. If your oven doesn’t have that setting, turn it to 150 degrees F.
- Combine the 2 tablespoons of milk you saved with 2 1/2 tablespoons prepared yogurt in a small bowl and reserve.
- Once the milk has cooled to between 105 and 110 degrees, add the yogurt-milk mixture and stir well to combine. Put the lid on the casserole dish and cover it with a dishtowel to help insulate it from temperature fluctuations.
- Turn your oven off, but now turn the oven light on. Just the light from the oven should keep the dish warm enough to enable the yogurt-making process. Put the towel-covered dish in the oven, making sure that the towel isn’t near the oven lightbulb, and leave the oven light on. Leave the yogurt undisturbed for 7 or 8 hours, or overnight.
- After 8 hours or the next morning, carefully take the dish out, unwrap it and remove the lid, and check to see whether the milk has turned to yogurt. If your batch isn’t quite thickened, return it to the oven and check on it again in an hour.
- Once the yogurt is sufficiently thickened, place the dish in the refrigerator for 3 hours. Cut 4 pieces of cheesecloth to fit inside a large wire mesh strainer. Run the cheesecloth under water and squeeze out as much water as you can.
- Line the strainer with the cheesecloth and place it inside a large mixing bowl. Spoon all of the yogurt into the strainer. Refrigerate for 1 hour and pour the liquid that has accumulated into a large measuring cup. Return the bowl to the refrigerator for one more hour, and strain the liquid again.
- Your delicious Greek yogurt is ready to enjoy! Stir it for a minute or two to smooth the mixture before serving. Or spoon it into a container and refrigerate it, tightly covered, for up to a week. Makes about 6 cups, or 8 6-ounce servings.
Notes
Nutrition
Save for Later
If you use Pinterest to save and share ideas, here’s a handy pin:
About Eliza Cross
Eliza Cross is the author of 17 books, including Small Bites and 101 Things To Do With Bacon. She shares ideas to simplify cooking, gardening, time and money. She is also the owner of Cross Media, Inc. and founder of the BENSA Bacon Lovers Society.


Thanks so much for this! I have made homemade yogurt before, but this method looks SO simple. I’m going to try it very soon!
Thanks, Annie – I was really surprised at how easy the whole process was. Plus – it was kind of fun, like a science experiment!
Eliza,
I was online this morning researching how to make my own Greek Yogurt and saw your posts. Looks great.
I too love Fage Greek Yogurt. Is what you make similar in taste, to that? I ask because I’ve had homemade yogurt but most of it is pretty tangy. The Fage does not have a tang and I prefer it without.
-Lisa
Lisa,
Most of the time the yogurt I make has the same mild flavor as FAGE. But occasionally it’s a little more tangy – although never as tangy as the “plain” grocery store yogurt. I think it has to do with the age of the milk. If you try the recipe, let us know how it turns out! 🙂
I made this greek yogurt yesterday and it turned out great! Now I can make it for a fraction of the cost of store bought and mine is just as good if not better! Thanks so much for this recipe!
Michael, I’m so glad you were happy with the recipe. 🙂
Quick question, I am wanting to make coconut Greek yogurt (not from coconut milk but with added shredded coconut) at what point do you add things like vanilla and or fruit/coconut etc? I am about to put my first batch in the oven.
Kadi, I would add the coconut at the very end, after you’ve strained the yogurt. Sounds delicious! xo
Hi There,
I realise that your posting on making my own Greek yoghurt is a few years old, but it never occurred to me to even try. The closest I’ve gotten was when I lived in New Zealand and couldn’t find the right yoghurt. Back then, I bought plain yogurt and drained it in cheesecloth to thicken it.
This method of yours looks doable.
Thanks for your post,
Hopefully,
Mrs Tammy J O’Malley
people always fogot to add any cost to produce yougurt, like heating milk, clean container…not mention it’s a bit time consuming, after all, u may not save money. but it’s a fun porcedure if you like it.
John, how do you find it not to save money. For a quart of high protein yogurt it is about 4.19. When you go to the store your self buy a gallon of milk for 2.12 you can make 5 quarts out of it. Its just simple economics.
Mrs. SPF is going to be SO happy about this article! Thank you so much.
We get LOCAL milk from Kawartha Dairy and it seems we can make this as a totally local mixture. Yum!
Using local milk is so great – can’t wait to hear about your own experiences in yogurt making.
mmm Kawartha Dairy. Only the best ice cream in the world! 🙂
I just made the switch to Stonyfield Greek Yogurt. It’s delicious, but not easy on the pocketbook. I’m going to try this recipe! Thanks for sharing.
My store doesn’t carry Stonyfield Greek yogurt, only the regular kind, but I’d like to try it (for research purposes, of course!) I also want to try the recipe you just posted, with the peanut butter patties Girl Scout cookies and Oreo cookie crust. YUM!
I love homemade yogurt! I use a thermos for a incubation stage, though I’ve heard of people using a slow cooker or even their car on a sunny day. I like your technique as well.
Kristina,
I love the thermos idea because it doesn’t use any electricity. A car on a sunny day? How funny. You could call it Passive Solar Organic Yogurt — doesn’t get much greener than that! 🙂
I love making yogurt. I bought a very cheap yogurt maker, which does use some electricity but probably about the same or less as an oven light.
By the way, last week I made Indian paneer cheese from a quart of milk and lots of whey leftover so went online for ideas. One was to feed it the dogs. Mine loved it!
Our dog Maddie asked me to thank you very, very much for the suggestion about what to do with leftover whey!
Eliza, this stuff looks great. I was planning to do a post when I had some time to whip up my first batch of greek yogurt as well, although I havent gotten around to it yet. I may just give your recipe a try here in the coming weeks.
It’s so easy, you should definitely try a batch and then let us all know how it turns out!
Looks delicious! I like to make homemade yogurt, but now that two of us can’t eat dairy, I don’t make it. . .
You might not be able to enjoy homemade yogurt, but you make up for it with Snickeroos!
you may do a search for soy yogurt. i just recently heard of it.
Melissa,
I have also seen yogurt at Trader Joe’s made from coconut milk. Maybe give something like that a shot. Of course watching out for carrageenan and added sugar.
Lactose intolerance does not exclude greek yogurt if you prepare it properly. Research that. Look for “The Essential Diet” by Elaine Gotschall.
I have never tried Greek yogurt, but I do want to and your article has given me the motivation to do so. Not sure if I’m ready to make my own though…
Amanda, making yogurt is waaayyyy easier than making Tiramisu Cookies! 🙂
I just want to point out (because I’m one of those pedantic foodies) that you’re not making Greek yogurt. You’re making Greek-STYLE yogurt. Just thickening regular yogurt doesn’t make it Greek yogurt. 🙂
IN order for it to be authentic Greek yogurt, it would need to be made from sheep’s milk or the higher fat cow’s milk that is available in Greece and other Mediterranean areas.
Greek yogurt seems to have become a fad/buzzword lately and all kinds of people are claiming to make/eat Greek yogurt … and they’re just not! 🙂
Thanks for pointing that out – I bet yogurt from sheep’s milk is soooo good! It totally makes sense that real Greek yogurt would naturally come from Greek cows or sheep. 🙂
According to Wikipedia, “Greek yogurt is yogurt which has been strained in a cloth or paper bag or filter to remove the whey, giving a consistency between that of yogurt and cheese, while preserving yogurt’s distinctive sour taste” while Greek-style yogurt “may be thickened with thickening agents.” I had some store-bought ‘Greek-style’ yogurt a couple of weeks ago and it was disgusting – I later discovered it had gelatin added as a thickener.
Thanks for your comments, and readers, you will love Kara’s recipes and photos on her beautiful blog http://karacooks.com .
Dear Kara- I guess Fage isn’t “real” Greek yogurt then. Because their yogurt is made from cow’s milk. And the cows are from the United States. And I happen to think that your comment was totally rude.
Ok, I am using fresh goats milk, I milked it myself…it took a few milkings to get the 1/2 gallon, but my first batch is in the cooling stage, I am so excited I cant wait to try it! I live on Fage yogurt and go thru 48oz in less than 2 days, I mix it with whey powder, and some sort of frozen or fresh fruit, I’ve been ill and the yogurt is really helping, we would go to costco and buy a case of Fage at a time, its around $7 per 48oz. A bag of goat feed is $16, she uses 2 a month, so I am saving a bunch and I know what is going into her milk. I was wondering would the Greek style goat yogurt have nearly the same protein content? BTW…my blueberries are starting to turn pink so we should have fresh blueberries in no time! That is going to be awesome the yogurt and fresh berries!
Wow, thanks for sharing that recipe! It doesn’t look that difficult and it looks really delicious.
You are going to love this recipe – the yogurt is just amazing. I liked your recent article about sharing with neighbors, too.
Try leaving the yogurt draining in the cheesecloth even longer and you have cream cheese. Its a little different flavor, but really good on bagels!!
Several months ago, I learned how to make Lebneh (also called Kefir cheese). The process is nearly identical to “Greek-style” yogurt, except a little salt is mixed in before pouring into the strainer and the straining period lasts between 12-24 hours. The end result is somewhat similar to cream cheese and is enjoyed by drizzling a little olive oil over it, sprinkling a few herbs (such as basil) and dipping pita bread into it. It is also used as a base for many middle eastern dishes.
As another person mentioned, with a longer straining time, the resulting cheese practically peels off of the cloth. The cloth I use is simply a “bread” cloth, one layer, which I tie at the corners and hang from a hook under the cabinet with a bowl underneath. The weight from hanging is greater than just resting a strainer in a bowl, so more whey is drained away.
Even though it is called Kefir cheese, it is most traditionally started with yogurt. However, I have made it with actual Kefir (homemade) as well. The yogurt base creates a mild flavor while the Kefir is more tart. Yet it is nice to have a cultured dip alternative regardless of the base.
Incidentally, our teens like it drizzled with honey and nuts!
You know that Organic yogurts in the United States are usually shipped as powder from New Zealand, hence all the down under connotations in yogurt marketing.
http://www.businessweek.com/magazine/content/06_42/b4005001.htm
Thanks for providing the link to that article, which I hadn’t seen. We clearly need more organic growers and producers here in the U.S. to meet the increased demand for good, clean food.
I used your recipe and it was really helpful, but you mentioned heating the milk to 180F. That step is unnecessary because it is pasteurization which is meant for raw milk.
You just need to warm milk to a temperature 115F – what I call jacuzzi temperature – where your bacteria will grow. Hope this helps
cheers
Thanks for sharing your comment. I’ve read various recipes and methods, but I can’t personally vouch for them. According to the National Center for Home Food Preservation, heating the milk to 180 degrees F is necessary for creating a safe product.
The usual reason for heating milk to 185 is not for *safety* (since most milk in the U.S. has already been pasteurized).
What it does is to denature the proteins or something like that which makes the resulting yogurt thicker than it would have been without the higher heat (and holding it for awhile at 185 or so makes that effect even stronger–I just leave mine in the microwave awhile after heating it before removing to cool back to 115).
Thanks for this info. I make lots of fresh cheese products and always wondered why most yoghurt recipes call for a high temperature step. I prefer to use fresh raw milk that I rarely pasteurize as my provider does a PCR test and I use it within 24 hrs of collection.
It works well for fresh cheese but I’m guessing the yoghurt wouldn’t set up correctly. Thanks for saving me a ruined batch!
Shannon
p.s. Someone earlier mentioned the New Zealand yoghurt. I got hooked on it when I visited once and still order yoghurt sachets from there from time to time. It’s *so* tasty!
So… what if you are using Raw milk? There is a reason I buy raw… I don’t want to kill everything in it. Can I use the lower temp?
I grew up in India with my mom getting fresh milk and pasteurizing it at home by boiling. For making yoghurt she would just reheat the refrigerated milk slightly and add starter. I tried this number of times here in US when I was new at cooking, never worked. Then someone suggested boiling it again and then cooling down before adding starter and success! I don’t know why this is so since the milk here in US is already pasteurized. So my method is pretty simple. Every day I put milk in a pyrex container in the microwave. Turn it off just when it starts to boil, leave in it for 2 minutes so it doesn’t boil over me, then take it out and leave it on the counter to cool. Then I keep poking my finger in to see if i can bear the heat for 2 seconds. If I can, then it’s time to add starter, mix and set in in a corner for 3 hours, well wrapped in a towel. Refrigerating it just when it is “almost” but not completely settled will give a more thicker yoghurt without any whey on top, very important if you’re using lowfat milk like me.
Sounds like a very easy method!…. though not entirely sanitary if you keep sticking your fingers in it, lol! 🙂
Hi, sounds so easy. But, how much milk and how much starter? How much does that make? Thanks for the share. Sandi
Actually, heating the milk to 180 for 5-10 minutes changes the protein structure and enhances the texture. Even better with raw milk, a good step for any milk.
This is an awesome article. I’m gonna show this to my wife and give it a shot!
Thanks, Jonathan – let us know how it turns out! It’s so easy, I’ve stopped buying yogurt and just make it here now. Plus, I’ve discovered that organic milk that’s nearing its expiration date (perfect for yogurt making) is often on sale at our store.
Thanks for posting this. We’ve been making homemade yogurt for a year or two but now I want to try making Greek yogurt.
This may be a silly question but do you throw out the cheesecloth after using it? I’m not picturing how one would clean it for future use. Thanks!
Great question! I actually tried to rinse out the cheesecloth after using it, but it was kind of a falling-apart mess. I think someone with more patience could possibly submerge the cheesecloth in a big bowl of water, gently rinse it, maybe repeat a time or two, squeeze it out and hang it to dry.
Try butter muslin if you can find it. I order it online from a cheesemaking place in New England (I think the website is just cheesemaking.com or something simple like that).
It can be used multiple times and is very strong. To clean, I rinse it right after using and then boil in water with baking soda. I would never use soap but that seems to work well for me.
Hope that helps!
Shannon
I use J Cloths! they work wonderfully and can be rinsed easily.
My understanding is that you can wash and reuse *real* cheese cloth. It all depends on what you have. “Cheese cloth” that you buy at most stores isn’t the real thing. It works great for certain uses, buy you’d never use it to make cheese, etc. The holes are bigger, the weave looser. This stuff seems to fall apart.
You can find real cheese cloth online. We get ours at an Amish store in Lancaster, PA. I haven’t tried it myself yet (though I may do it today) but once I’ve hemmed in the edges, it should work nicely and be wash and reusable (an Amish woman I talked with told me she does this.)
Hope this helps!
Great tip, Babychaser! An Amish store seems like the perfect place to buy real cheesecloth, and I’ve been trying to find a source because the grocery store variety is also very expensive for what you get. As far as how long it keeps, I’ve read varying recommendations from 5 to 10 days. Some sources say if you keep it longer, less of the “good” bacteria remains.
I use an old tee shirt. I don’t cut it or anything, I just set it into the strainer so that it is two thicknesses, and pour in the yogurt. It will sort of peel off the next day, and I just put it in with the rest of the wash. It works perfectly.
I just made my first batch of yogurt today. For the incubation stage: the recipe I followed had you pour it into glass jars and then put the jars in a cooler with hot tap water up to the yogurt level. Way easy.
That does sound easy, and I like the fact that it doesn’t use any energy. Thanks for sharing this tip, Gaylynn.
I’m curious…What makes you say it will last 6 days??? Is it because you’ve stripped the whey? I usually keep my “regular” homemade yogurt 10ish days, which is nice because we can only get our raw milk on Mondays… so I need my starter to last at least that long.
Any input would be welcome.
I researched the recommended time to keep homemade yogurt online, but I’m not surprised that your experience proves otherwise. We’ve kept ours longer, too, with no ill effects.
Thanks so much for the yogurt recipe – this is our first year with icelandic sheep and goats, so we are experimenting with the milk – can’t wait to try it. I’ve made Feta cheese with the goat’s milk – yummy – basil and garlic added too
Wow, Linda, that feta cheese sounds so good!
did you know… that yogurt incubation can be achieved by placing prepared yogurt mixture in a sealed container(i.e. a 32-oz. old yogurt carton), and putting container in a cooler. add enough HOT tap water to cooler to fill it about half-way up the side of the container. close lid of cooler…. don’t peak!… and check in about 4 hours… ta-da!!! totally energy-free incubated yogurt. secondly, instead of cheese cloth, how about recycled sheer curtains cut into appropriate sizes and placed over colander… pour yogurt into curtain/colander and strain.
Thanks for these tips, Tina. I’ve also heard that a heating pad on low can incubate yogurt.
Except the energy it requires to heat the water of course.
Hi Eliza!
This is a great recipe and such a clear, thorough tutorial. We decided to share it with our readers on DietsInReview.com.
You can see the link back to this post here in our Q&A section: Which Yogurt to Use on the 17 Day Diet.
Thanks for your post!
Thank you, Brandi! How nice of you to send your readers our way. I enjoyed reviewing your site, too. 🙂
Can I try this with a smaller amount of milk to start? I’ve never tried it before and just want to try it with a smaller batch. How would I adjust the measurements?
Yes, you can make this recipe with a quart of milk. You’ll need 1 to 1 1/2 tablespoons of plain yogurt with active cultures to add to the mix. All the other directions will remain the same, and you should end up with about 2 cups of Greek yogurt when you’re through. Good luck!
While out grocery shopping I spotted half-gallons of organic milk and remembered this recipe. Since I love Greek yogurt, I decided to give it a try last night.
I had just put the starter/milk mix into the oven when I looked again at the milk carton. Then I saw the words of doom waaaay down at the bottom and in small print: ultra-pasteurized.
I know ultra-pasteurized is a no-no for cheesemaking since the process messes up the milk proteins, but I crossed my fingers and hoped for the best.
It’s yogurt–sort of. Quite mild and tasty, but way too thin. When I tried to strain it, the whole thing oozed through. That’s the bad news.
The good news is that it’s the perfect consistency for making lassi! (Indian yogurt drink) I don’t need the blender anymore to get a smooth drink. Hurray! One less thing to wash.
Must try again with proper milk, though.
Thanks! Just noticed the same issue with the milk I’m using right now to make yogurt! Ugh!
Kirsten, how did your yogurt turn out? It seems like much of the organic milk in stores is ultra-pasteurized. (A long expiration date is a big tip-off!) However, I’ve made several batches of thick, creamy yogurt with ultra-pasteurized milk and it didn’t seem to affect the recipe above. You might enjoy this thread on Chowhound which has more information about why yogurt can sometimes have a thin consistency and tips for success. I added a note about this in the recipe and appreciate your comments. Joanne, I love your idea to use thin yogurt in lassi!
My husband has been very into making yogurt lately, but it’s too thin for my taste, and I so love Fage Greek yogurt — so I’m very excited about this! If one extra step can give me that consistency, I’m all for it. Reading through the comments, I’m now wondering: if “ultra-pasteurized” is what I DON’T want to see on the carton, what is it that I DO want to see?
Also — I know that Greek yogurt is known for being very high in protein… does this recipe fit that bill as well?
Just look for regular pasteurized milk, organic if possible. And yes – Greek yogurt is higher in protein because it’s more concentrated. Good luck! xo
Yes Greek yogurt has more protein but less calcium.
Eliza, it was use the stuff in lassi or cry. 🙂 I tried again, this time with regular milk. But the only non-fruited, active culture yogurt I could find in that store was a Stonyfield Greek with honey on the bottom. Unfortunately it also had carob bean gum and pectin added to it.
Same result: too-thin yogurt. This batch I heated to almost boiling, added 4 T. of lemon juice to it, and left it for a while. When the whey had separated enough, I drained and pressed it in its cloth. I added a bit of kosher salt before I stuck it in the fridge and it seems to be a nice little “ricotta” sort of thing.
I will admit that after reading another post, I did not heat the milk to 180. After reading on the link you provided (thank you!), I most certainly will for Try #3. For all I know, that was what messed up the previous two tries, not the ultra-pasteurized milk (which you’ve had success with) or the thickeners in the Stonyfield yogurt.
Wish me luck!
YES! It worked!
Thanks for this recipe, Eliza.
Hurray! I’m so glad you were happy with the recipe, Joanne.
From my knowledge, you CAN use more yogurt, but if you do that, you can’t let it sit as long. For example, if you used like, a cup of yogurt, you’d only let it sit for about 3 hours. Since you only use a small amount, it requires much more time to build up the bacteria.
As well, I read another person’s comment saying that it’s fine to forgo heating the milk to 180 if it’s undergone pasteurization already. This is untrue. It still needs to be heated up. There are different methods of pasteurization, anyway. Not all of them heat the milk to 180.
Also, little miss muffet ate curds and whey, essentially cottege cheese.
You’re right – you do need to heat the milk to 180 degrees whether it’s pasteurized or not. And thanks for the clarification about Little Miss Muffet!
Hi! Quick question…the reserve 2tbs of yogurt that you retain for a starter for your next batch…how long can that be kept? Can it be frozen to be kept longer?
Also, the yogurt that you purchase for a starter, does it matter if it’s already greek yogurt? For example, I have a tub of Chobani vanilla flavored greek yogurt in my fridge. Can I use that? I’m not that concerned about whether it’s organic or not.
Hi Crystal,
I’ve read that you can freeze the yogurt that you’re going to use later to ‘start’ the yogurt. I haven’t tried it but it sounds like it will work just fine. You can absolutely use the Greek yogurt you already have in the fridge to start your homemade batch. The important thing is to make sure it has those active cultures, and there should be a notation to that effect on the side of the carton. Good luck and let us know how it turns out!
~Eliza
Hi there – I have a question about the yogurt making process in your recipe. Can you tell me about the food safety aspect of leaving the milk out overnight, or for more than four hours? I want to try this but I don’t understand how this process is “safe”. I understand you must need a way for the good bacteria to grow but how do you stop the bad bacteria from growing? Please help! I’d love to make this! Thank you!
Deborah,
Great question! If you make sure to heat the milk to 180 degrees, use clean utensils and discard any yogurt that fails to set properly you shouldn’t have any worries. Here’s a little more information from the National Center for Home Food Preservation:
“Yogurt provides two significant barriers to pathogen growth: (a) heat and (b) acidity (low pH). Both are necessary to ensure a safe product. Acidity alone has been questioned by recent outbreaks of food poisoning by E. coli O157:H7 that is acid-tolerant. E. coli O157:H7 is easily destroyed by pasteurization (heating). Therefore, always pasteurize milk or use commercially pasteurized milk to make yogurt.
Discard batches that fail to set properly, especially those due to culture errors. Yogurt generally has a 10-21 day shelf life when made and stored properly in the refrigerator below 40°F. Molds, yeasts and slow growing bacteria can spoil the yogurt during prolonged storage. Ingredients added to yogurt should be clean and of good quality. Introducing microorganisms from yogurt add-ins can reduce shelf life and result in quicker spoilage–“garbage in, garbage out”. Discard any yogurt samples with visible signs of microbial growth or any odors other than the acidity of fresh yogurt.
Always use clean and sanitized equipment and containers to ensure a long shelf life for your yogurt. Clean equipment and containers in hot detergent water, then rinse well. Allow to air dry.”
I’m wondering if there’s a way to figure out protein content in this recipe? The reason I use Greek yogurt is for high protein & low sugar and am wondering if this recipe would be good for it???
Dear Emily,
If you make regular yogurt, the protein content will be identical to the ingredients you use. If you make Greek yogurt, some of the protein will drain off in the whey so it’s trickier to estimate the exact protein content.
If you want to increase the protein content in this recipe, you can add 1/3 to 1/2 cup powdered milk to the regular milk before you heat it.
Good luck, and if you try adding the powdered milk I’d love to hear back from you about whether you’re happy with the result!
Thank you for this recipe. I tried it for the first time yesterday. It was super easy. I accidentally used Ultra-Pasteurized Organic Milk, so next time I will use just Pasteurized. The yogurt turned out great. I strained it overnight. Next time I will just strain it for 1 or 2 hours.
Sandra – I’m so glad you were happy with the result and thanks for your comments.
How do you calculate the amount of protein in the homemade yogurt? Is it the same as the milk? I’m not sure since the whey is drained off.
See above – Emily asked a similar question. For the highest protein content, add some powdered milk and make Greek yogurt, which will concentrate the protein content. Good luck and thanks for your question!
I think you just saved me a lot of money. I buy more yogurt than anything else in my fridge. My son and I are trying it tonight!
Good luck, and I hope you and your son make many wonderful batches of yogurt together, Brad! 🙂
Can the yogurt be made w/ non fat milk? Any experience w/ this? Any alterations to the recipe? I’m def. going to try it. Love the streamlined recipe and your relaxed substitutorial (?) way w/ a recipe! Card.
Yes, you can totally make yogurt with non-fat milk. You can even make the strained, Greek yogurt with nonfat milk. I prefer 1% myself, but non-fat will work fine. Just follow the directions exactly and I think you’ll love the result. Let us know how it turns out!
Thank you for the recipe! I can’t believe I made my own yogurt. It was easy and I didn’t have to wait all night. Only took 6 hrs. WOW! Yogurt is one of my fox staples and to know I can make it myself without chemicals and sugar all the better. My brother is a health nut and a chef and I can’t wait to tell I did it. Thank you so much. 🙂
Anne, your happiness is infectious and I’m so glad you’re enjoying making your own yogurt!
I have my 4th batch cooling on the counter right now, and I am so happy to have found this recipe. I like it plain, but my daughter loves it with some vanilla bean paste added for flavor. I noticed that most of the organic milk at the grocery store was ultra-pasturized in the half gallon and quart containers, but that the same brand in gallon containers was not ultra-pasturized. I thought that was odd. Anyway, so happy to have found this recipe and your site thank you so much!
What a great idea, Karen. Readers, in case you’re not familiar with vanilla bean paste it’s like a thick version of vanilla extract that contains the little vanilla bean seeds – and the truest vanilla flavor ever. You can buy it at places like King Arthur Flour and Williams Sonoma.
Came across this advice while Googling Yogurt-making, as I’m getting still getting 14-16 liters (30 pints to you Yanks) of ultra full-cream milk a day from our Jersey Cow Chloe, and the pigs we were fattening on it have gone to the great mud-bath in the sky (and our freezer!) Our neighbours take what they can and it seems a shame just to dump the rest, but down here in New Zealand we are only allowed to sell 5 pints a day at the farm gate.
Question 1: is it necessary to pasturise milk only minutes from the cow before dumping the starter in? It’s still warmand can sit on a rack over the log-stove for the day incubating – it’s mid-winter in New Zealand.
Question 2: a previous attempt to make yogurt in a kit with little pottles resulted in a layer of cream on top 1/2″ thick like the skin on a tin of paint. Is there any way of home homogenising milk?
Sort of question 3: the aforesaid previous attempt produced what tasted like yogurt under the skin but refused to thicken. I partially solved that by using as a started a powdered yogurt mix – just add water – but I added a tablespoon per liter of milk. I’d like to try the Greek style but without ‘cheating’ and adding the powder I suspect it would all just drain through the cheese-cloth.
Next stop, cheese.
Hi, Tom — see Daniel’s helpful response to your questions just a few boxes down, and give Chloe the Jersey milk cow a scratch behind the ears!
Hi there, I just tried this for the first time. It is in the fridge right now straining and I can’t wait for it to be done. But I had a question about the taste. You mentioned that yours comes out with a mild taste but mine came out pretty sour. It’s fine with honey, but not what I was expecting. I am wondering if the length of time I had it in the oven had to do with it. I put it in with only the oven light on at 10pm and didn’t take it out until 9:30 am cause I slept in. So is that way too long and had I taken it out after 8 hours, it would of been more mild? From what I’ve read, it sounds like the sour it is the more fermented it is and healthier for you, but I still would like to have some control over it if I wanted it a little sweeter. Thanks for this recipe, I can’t wait to try the Greek yogurt tonight!
Hi!
What a great night’s sleep you got! Trying not to be jealous. 🙂 But with regard to your yogurt, I would have to guess that the extra fermenting time resulted in a more tart taste in your case. The batches I’ve made sit in the oven with the oven light on for 8 hours, and the yogurt is mild and creamy — amazing. So maybe try making a batch during the day next time, because for gosh sakes–if you can keep getting 11 1/2 hours of sleep you shouldn’t change a thing about your nighttime schedule.
xo
Eliza
@Tom from Down Under-
1. The step of heating the milk to 85deg C (185F) does much more than pasteurize the milk, (kill undersirable bugs). Fresh raw milk is remarkably resistant to spoilage due to the presence of certain live enzymes. Unfortunately, these same enzymes also antagonize the yogurt-making bugs, so the high temp is necessary to de-activate these natural preservatives.
The natural milk proteins are also partially denaturized by the heat, which impoves the texture markedly. Put it simply, do NOT skip this step!
When I make Greek Yogurt, I use a bain-Marie to heat the milk, stirring it constantly so it doesn’t skin-over. I keep it at 85deg C (185F) for 30 minutes (yes, one half-hour) which results in a thicker product. I cool the upper pot in a sink full of cold water before I pitch in the starter. The rest of the procedure is standard, and the author does a good job describing what to do.
By the way- don’t recycle your yogurt as a starter in perpetuity. After too many generations, the bugs evolution changes their biology and may produce an off-taste.
As far as homogonization goes, that requires special equipment to force milk through a set of very small orifices, rupturing the membranes of the suspended fat globules. Not something to do at home. Just mix the butterfat back into the yogurt. (I skim mine and eat it straight-up when I am in the mood for an extra-rich treat!) It is not likely to separate when you make Greek yogurt, in any event.
I live in the hills of upper-eastern Tennessee, and I get my milk fresh from a neighbor’s Jersy Moo-Cow.
Yum!
Thanks for this great information! We have no nearby cows in our suburban neighborhood but I wish we did.
Hi. I used your recipe last night and was very careful to stir stir stir. The only thing I did differently was double the recipe. It has slept in the oven for about 9 1/2 hours now. This morning it loooks like your picture except it is much more watery. I don’t think we used too much yogurt. Do you think it needs to stay in the oven longer?
I also tasted it and it tasted warm, like a combo of sour milk and yogurt, and thin. It’s the consistency of… hmm… partially pudded pudding.
Would you say I should leave it in the oven longer or have I screwed it up? Please answer as soon as you can! Thanks.
Laura Lee,
I would suggest letting the yogurt ‘set’ for another couple of hours in the warm oven if it still seems thin. When you refrigerate it, it will thicken and then you can pour a little of the whey off, too. Good luck!
xo
Mine turned out kinda thin – nothing I’m sure another sit thru the cheese cloth won’t cure – but super super tart, like drinking straight lemon juice – I used 2 tablespoons of plain yogurt – any ideas what I may have done wrong. I really want to start making my own yogurt – both to save money and to ensure we are eating healthier.
Hi, Rebecca –
Sorry for the disappointing result. 🙁 But you might not have done anything wrong. Perhaps the plain yogurt you used for a starter was “off” and the bacteria weren’t all alive. You might experiment with another brand. Also, the longer you ferment the yogurt generally the more sour it will become. So you might try your next batch with a shorter resting time in the oven. Make sure you follow each direction exactly as far as the heating and cooling temperatures, and don’t cover the dish with a lid or anything while you’re waiting for the temperature to drop to 105-110 degrees F.
If you want a foolproof way to make thicker yogurt, you can add 1/4 cup of dry milk powder to the milk before you heat it initially. The added protein will help thicken the mixture.
Good luck and I hope you’ll try again!
The best way I found to incubate yogurt was a big cooler and heating pad set on medium, but next time I’m going to try it your way! Seems so much easier.
I had one batch that was sooo tangy (twaaaang!) that I couldn’t tolerate it. I drained most of the whey and added fresh milk. The previous batch was yo cheese and I didn’t want another one, so this rescued the yogurt. (I am the queen of failed yogurt.)
The one batch I made that was really tangy also happened to be the batch I left in the oven the longest. You might try this: heat your oven to 150 degrees while you are making the yogurt mixture. Turn it off as soon as you pour the yogurt in the container to cool on the countertop, and turn the oven light on at that time. Proceed according to the directions, and start checking the yogurt after 6 or 7 hours. This may give you the firmness you want, without the extra tangy-ness. Good luck and let us know how it turns out!
Thank you for the great recipe and tips, I had planned to try the crock poy, but then found your method. I am so happy with the results! No more Chobani for me, homemade organic yogurt for a fraction of the price!
Thanks, Tawn. Isn’t it satisfying to make your own? I love it on so many levels.
I have been making yogurt for years, and since I did not have a thermometer when I began I never have used one. I heat the milk in a double boiler until the water boils, stirring frequently I cool the milk in the pot on the counter for 40 minutes. I heat a small oven to 150 ( lowest setting) then turn it off, add starter to milk turn off the oven and let culture for 6-8 hours. Works every time!
Thanks for sharing your process. I’d like to experiment with this since it sounds easier. After all, people have been making yogurt since Biblical times without thermometers so it should be do-able! 🙂
I now strain my yogurt with paper towels or coffee filters. No problems. I now heat my milk in the microwave and then eventually “cook” in the oven on my proof setting or with the oven light on. In the past I had great success with making a smaller amount of yogurt on a heating pad. Now I make 3-4 quarts at a time.
Great idea, Cindy. I also like your suggestion to use the ‘proof’ setting in the oven. Soon we won’t be using incandescent light bulbs because they’re being phased out, which is a very very good thing, but I’ll need to adjust this recipe accordingly!
Just to let everyone know in relation to the asterisk…. All milk, whether it is organic or not, does NOT contain antibiotics. It is all tested before it is put onto the shelves and any milk that tests positive is rejected.
Thanks for your comment and clarification, Moo Moo, and I updated the notation accordingly.
Readers, for further information you might want to check out this article “F.D.A. and Dairy Industry Spar Over Testing of Milk,” in the January 25, 2011 New York Times:
“Today, every truckload of milk is tested for four to six antibiotics that are commonly used on dairy farms. The list includes drugs like penicillin and ampicillin, which are also prescribed for people. Each year, only a small number of truckloads are found to be “hot milk,” containing trace amounts of antibiotics. In those cases, the milk is destroyed.
But dairy farmers use many more drugs that are not regularly tested for in milk. Regulators are concerned because some of those other drugs have been showing up in the slaughterhouse testing.”
According to the article, in 2008 federal inspectors found illegal levels of antibiotics in a fraction of the 2.6 million older dairy cows bound for the slaughterhouse that year. Concerned that those antibiotics might also be contaminating the milk Americans drink, the F.D.A. wants to start testing for the two dozen antibiotics that are actually used. The plan was met with opposition by the Dairy Farmers of America.
Thanks so much for this info. I’m so excited to try it.
Tyeanna, happy yogurt making and let us know how it turns out!
This is great! Simple, and it is organic (if you use the organic products)!
I used to (sometimes) make large batches of yogurt on a ship and used the warmer to ‘keep’ it then refrigerate, but haven’t really gave it a second thought about making it at home. But just recently (and the addition of a young one) my taste buds have change and really like the ‘Greek’ style yogurt.
Works great for smoothies too!
Thanks, Tyrone, and I enjoyed visiting your blog, too! Readers, check out http://tyronebcookin.com/ for some great postings about food.
This is fabulous! I’m a Greek Yogurt lover and your technique was easy to follow. Thanks for sharing!
Hurray! If you’re happy, I’m happy. Thanks, Kat.
Thanks for article. I have been making the yogurt using an old Salton Cosmopolitan Yogurt Maker with blue lid and 5 white cups that I bought at a thrift store for $3.00. I love the way it comes out. I have made it a few different ways sometimes using yogurt that I purchased and sometimes the yogourmet starter. The last time I made it I used more than a few tablespoons of the left over yogurt for the starter and it was more sour than usual. Thanks for the tip. Question: My maker did not come with instructions so I found some online. It says do not use any yogurt with sugar and it will not process right and vanilla would have sugar in it I believe. Any thoughts on that? Also I always add powdered non-fat milk to my mix as I am warming the milk as the instructions I found said that makes thicker yougurt. Thanks, Barbara
Thanks for the tip about adding the powdered milk, Barbara. In answer to your question, I haven’t tried making it with sweetened yogurt so I’m not sure if it will affect the process or not. Maybe one of these days I’ll conduct an experiment! Thanks so much for stopping by. 🙂
Hi,
thanks for this recipe. However, I have not had much luck after making 3 batches.lol
-My first batch I followed the instructions exactly. I added the 1/3 cup of powdered milk for thicker yogurt. The problem I had was my oven light burnt out over night (8 hours) and the yogurt was like water.
-Second batch after getting a new oven bulb. well after warming the milk must have not stirred enough and burnt the bottom of the pan. The whole house smelled like burnt milk. The milk also tasted burnt. yet instead of just throwing it away I would try it again and practice. This time I forgot to add powdered milk. Yet after 8 hours it was yogurt. thicker and nice. yet it tasted like burnt milk. 🙂
-Third batch. I was determined to make it work. This time I stirred really well. no burnt milk. I also once again added the 1/3 cup of powdered milk as I was warming it. After 9 hours and in the fridge over night its like thick soup. I tried to strain it in some filters and nothing strained its too thick but not like yogurt.
Any ideas why this is not working? I am wondering if the powdered milk is the problem. Does the milk have to be a certain temp when I add it?
The yogurt I used was ff fage greek. I also use skim milk.
Any advice would be greatly appreciated.
thank you,
david
Dear David,
I am so sorry to hear this! But I applaud you for being persistent. Here’s what I suggest. I have a feeling your oven may not be getting warm enough from the lightbulb. Why don’t you preheat the oven to 150 degrees during the step when the cooked mixture is on the counter cooling. Turn the oven off just before you put the covered, towel-wrapped container in the oven, but do leave the oven light on. Then proceed as directed. Also, would you be willing to try a batch with 1% milk? I think the little bit of added fat will help it thicken, too. I would love to hear back from you if these suggestions help, and I will be sending you positive yogurt-making vibes!
I just made this yesterday and WOW! It is so delicious and I love that I can save on my grocery bill! Thank you so much for sharing! 🙂
I’m so glad you were happy with the results, Jenna! I love the savings, too. 🙂
Hello Eliza,
I have tried this twice and had some luck. The first batch, I forgot about my oven light, so it was still liquid after 8+ hrs. The second time it worked…but my yogurt has a glue like consistency. I even strained if for several hrs and it still has this gooey texture.
Did I not leave it the oven long enough? It tastes great and I will be trying again, but just that I’d inquire, any thoughts?
Thanks!
Olivia
Dear Olivia,
It sounds like your yogurt was a little thin, so I’d suggest preheating your oven first to 150 degrees during the step when the cooked mixture is on the counter cooling. Turn the oven off just before you put the covered, towel-wrapped container in the oven, but do leave the oven light on. Then proceed as directed. I think the little bit of extra heat will jump-start the mixture. This has worked for me in the past and I hope it works for you! Let me know, okay? And thanks so much for stopping by.
xo
Eliza
A friend of mine told me she made her own yogurt and said it came out really good. When I asked her for the recipe, she pointed me to your website and said she followed your directions to the letter. My oven doesn’t have a oven light (it’s an old gas stove). It is lit via a pilot light. Do you think that the heat from the pilot light would be warm enough to process the yogurt? My 8 year old son LOVES to eat yogurt and I’d love to try making my own.
Thanks for sharing!
Is this process safe? Do you know how much fat, protein and calories would be in a cup?
I have been making Greek yogurt for quite awhile now and I love it. I had been eating the Fage brand for quite awhile and it was my favorite. Unfortunately, I saw the price rise and the size of the container shrink until I was paying almost $2.00 for 6 ounces. Something had to change so I turned to my bff, Google, to teach me how to make it at home.
I make it the same way you do. My oven doesn’t have a setting lower than 200 so I just set my oven to preheat and set the timer for 1 minute only. I do this while I’m putting the starter and powdered milk into the cooled milk.
I have really enjoyed reading your blog!!! Thanks!
I’ve been making my own yoghurt for many years now, instead of throwing out the whey I use it to make a Norwegian cheese called Gjetost (Brown Cheese) which is delicious… and as I know live in Norway, appropriate! :o)
Found this after reading your comments.
Uses for whey. Go to the bottom of the recipe.
http://www.stacymakescents.com/homemade-greek-yogurt
Thanks so much for stopping by to share this information, Brian. Who wants to waste the whey when it can be put to good use? Very helpful.
pleas send me process of the yoghurt production
I,m a small produtoer in sri lanka
Thank you SO much!! I’ve been making my own yogurt for over a year, but did NOT know why it was so watery!! Came upon your site to make Greek yogurt, so I am trying to make a batch now!! Both my children love yogurt and my son is coming home from Afghanistan next month, so I’ve been trying to improve on my recipe so he can have plenty when he comes home. I’m so excited! : D
I just finished separating the whey from my yogurt…this is the best I’ve made in 2 years! My kids will be so excited.
Question, has anyone had any luck making yogurt using soy milk or almond milk?
I’m not sure about soy milk or almond milk, but thought you might be interested in this recipe for making homemade coconut milk yogurt:
http://www.smallfootprintfamily.com/2009/04/25/homemade-coconut-milk-yogurt/
Instead of incubating in the oven, I used a small space heater on the countertop. The batch was covered and wrapped in a towel. I could move the heater accordingly and confirmed w/ a thermometer 100* sustained heat for 12 hours. Stained 3x (just like fage) for some rediculously thick fat free yogurt!
That’s a great idea, Wilson. Thanks for sharing it!
Thank you for this recipe i have been using it for a couple of months now and love that i control what the sugar content is.. store bought is so high in sugar and being diabetic i can’t eat much of it! after eating this my Blood Sugar doesn’t go up much at all!!!
Tammy, what happy news. 🙂 I’m glad you can make your own yogurt and stay healthy. Thanks so much for your comment.
Such a great and simple recipe- I used the Wallaby organic yogurt you have in the picture, very delicious!
So glad the recipe worked for you, Jennifer. Thanks for letting us know!
Thanks for the recipe. On an associated note, while I do like sweets, I don’t always like to start my day with sweetened yogurt. Instead, I like to have a yogurt and tomato salad for breakfast. This gives me a good dose of protein without all the carbs that yogurt with granola and sweetener delivers. To make my “salad” I use about a cup of coarsely chopped high quality tomatoes, about a cup of Greek yogurt, fresh sea salt and pepper, and a drizzle of olive oil and balsamic vinegar. Yummy and filling without all the carbs.
That sounds fabulous, Mike. Thanks for sharing your low-carb lunch special with us.
I have been making the yogurt for about 2 months now and love it. I have also got my son and his wife involved. But I have been having a little problem,my yogurt sometimes has a grainy texture I can’t figure what it is that I do wrong the taste is good, but the texture feels like small cheese curds. Any ideas of how to correct this? Thanks for a great site. Linda
I haven’t tried it but it sounds like it will work just fine. I love the way it comes out. Both are necessary to ensure a safe product.
So if I don’t have an oven (just a smaller toaster oven) could I just skip the oven light step? Would leaving it on the counter be enough heat? Or maybe putting a desk lamp on it while keeping it covered? Thanks for the awesome post!
This yogurt looked very nice. I love eating yogurt but I only tasted the commercially-bought yogurt. I haven’t tried making a homemade yogurt so I am excited to try this recipe. Thanks for sharing it.
we have been using powdered whole milk to make yogurt. hard to find this product, but amazon carries it. made by nestle, called Nido; about $13 and makes about 4 gallons of milk, more if you like thicker tastier milk, ditto yogurt
Great tip – thank you, Joanne!
I’ve been making yogurt in my crockpot for a few months. I basically followed these instructions, but did it in the crock (although I am a microbiologist and did not keep the pot open to air or change pots because I was paranoid about contamination). Anyway, the first time I used Chobani as a starter. The yogurt came out perfect. So thick with no need for straining. Next I tried Wallaby and then Stoneyfield. The results were good, but nowhere near as good as with the Chobani. I still have to go back and repeat the results with Chobani, but I’m wondering if their cultures make the difference. Anyone else experiment with the starter?
I do this exact recipe of yogurt only I do it in a crockpot so easy.
I am going to have to try the crock-pot method. Thanks, Penny.
I love Greek Yogurt! But it’s so expensive. I found out that I could make cheap greek yogurt easily by using a yogurt strainer. You just pour in cheap store-brand yogurt, refridgerate and voila! 4 hours later you have delicious greek yogurt for about 1/4 of the cost. You can even use organic yogurt for a good price too.
*Note: regular yogurt only makes about half as much greek yogurt. So a 32 oz container makes about 16oz of greek yogurt. But still that’s about $1 per 16oz! Verus $3.5 or more for greek yogurt. Put it in little containers with a littler sugar and fruit and save a ton over individual greek yogurt cups!
Thanks for sharing this simple idea! 🙂
Well, five gallons of milk later and I still can’t make yogurt. I’ve tried variations of this recipe using different types of milk and yogurt, added powdered milk, used different kinds of pots to “incubate” the yogurt – nothing works. It’s not that the end result is grainy or sour, the yogurt just won’t form, I basically end up with warm milk. Disappointed!
I feel personally responsible for your yogurt not forming, and I am going to e-mail you so we can correspond and figure out what’s wrong. Your “Yogurt Luddite” name made me laugh. 🙂
Ah, thanks. I think the problem is that the yogurt wasn’t staying warm enough during the incubation period (oven light wasn’t sufficient). I had a gift card so I ended up buying a yogurt maker and have a batch in there right now. Hope it works!
Success! Turns out, the issue was the temperature in which I incubated the yogurt. I followed the rest of your instructions and the yogurt turned out great!
Hurray! I’m happy now. 🙂
I’ve seen lots of great ideas in the comments. I use the cooler technique with glass quart jars and lids and some with boiling water in them to maintain the temperature because I make so much at once. I also sterilize things — including spoons, pot, containers – to not introduce unwanted bacteria. The whey can be used in so many other ways — (with acidity)ricotta cheese, cottage cheese…. Need to Google and go to quite a few sites to see lots of variations. Basic thick yogurt is made with very high fat milk. The milk used in Greek natural — as she mentioned with sheep, Jersey cows — their milk is much higher in fat than say Holsteins. Milk from the animals, heated, and then made into cheeses, yogurt, etc will be rich and thick. Our regular “whole” milk has lots of fat removed so they can sell cream. Putting some cream back will help. Whey has sugar in it, so taking it out also does take out some sugar.There are lots of cookbooks out there for ways to use yogurt, so do remember that you can have lots of options. Temperature is critical — so it your attempts aren’t working, do figure out a way to keep that 100-110F. Another way to get better drainage faster — stir the yogurt before straining (I use basic, cheap coffee filters – buy them bulk). Unfortunately, look at different yogurts you like — many use thickening agents. Very many. I also freeze yogurt in thick baggies then into a big thick bag– into the deepest part of the freezer (to avoid freezer burn). I have good starter for each time rather than using from made batches and losing the quality over time. I also have starter for whenever I want — like after a vacation or maybe an illness. It sure feels liberating doesn’t it! Thanks for posting and helping others!! Saving money feels great….
My favorite Greek yogurt is Oitkos Organic. It has 5 live cultures, no thickeners, and is made from pasturized non-fat organic milk. Stonyfield has just bought out the company and the plain 32 oz. has become difficult to find. I can only find it at Whole Foods and it is expensive! This blog has given me the inspiration to make Greek yogurt from scratch using a starter from my favorite yogurt. WOW! I’m excited!
Do you know if this greek yogurt has as much protein as the store bought stuff?
Viviana,
The protein percentage would be determined by the milk you use and how much whey you strain out, but in general there shouldn’t be a big difference. If you want to boost the protein level of your homemade yogurt, add a couple of tablespoons of dried milk powder to the milk when you first heat it. Thanks and good luck!
xo
Eliza
Do you have any suggestions if your oven doesn’t have a light?
Yes, you can use the “proof” setting if your oven has that setting. Or you can put the towel-covered dish on a heating pad set on “low.” Some people even pack the towel-covered dish in a cooler and add some glass jars of very hot water to keep it warm. Good luck!
So very excited! Cooling in the fridge right now! $4.40 for a gallon of yogurt! AMAZING!!!!!
So glad it worked for you!
xo
I love your blog and have been thinking about making yoghurt for a while. Last night I had about a litre of milk that was turning sour so I heated up the 2% milk till it nearly boiled and then allowed it to cool down to about blood temp (my thermometer is broken).I poured the milk into a glass bowl and I stirred in one tablespoon of bought plain yogurt and then covered the bowl with a clean towel. I placed the bowl into my “hot box” which is just two big pillows and left it for the night. This morning I had lovely yoghurt but it was a little thin so I poured it into a cheesecloth and placed the whole lot in my sieve over the milk pot from last night. I left it in the fridge while I went for a cycle ride. When I got home we had lovely thick yoghurt on our cereal. It was so easy thank you!!
Hurray! I’m so glad the recipe worked for you, Hilary. Thanks for stopping by.
Can you use whipping cream rather than milk?
Whipping cream has 0 carbs and the yogurt I use has 9 grams of carbs per cup. This would be very low carb for those of us on carbohydrate diets.
TQ, I don’t have any data to support this but it seems like you could try replacing some of the milk with some cream – my hunch is maybe 15 to 20 percent. If you experiment, will you let us know how it turns out?
I make yogurt with heavy whipping cream all the time and it works fine. For those counting carbohydrates it is great!
I do not use the powdered milk or the gelatin. Simply the heavy whipping cream and 2.5 tablespoons of Fage yogurt. I incubate mine in an ice chest with a heating pad. I cover the ice chest with a heavy quilt and in eight hours, I have the most wonderful yogurt you can imagine.
Man, I bet it tastes great! xo
I stuck an outdoor thermometer in my oven with the light on. It only reached 75 degrees? Is this safe? Another site I saw says to keep it a 110.
Suggestions? Alternate methods? Thank you! I really want to try this!
Does your oven have a “proof” setting? If so, I’d use that because I agree that 75 degrees seems too low. Or you might try this: heat your oven to 150 degrees while you are making the yogurt mixture. Turn it off as soon as you pour the yogurt in the container to cool on the countertop, and turn the oven light on at that time. Proceed according to the directions, and start checking the yogurt after 7 or 8 hours. If you read through the comments, you’ll also find some other methods for maintaining the heat. Good luck!
This is great yogurt. I use the microwave instead of the stove top. It takes between 16 and 17 minutes, on High, to reach the correct temperature. I also add a cup of dry milk to add extra calcium.
Thanks for sharing your tips, Barb – much appreciated!
My son taught me how to make yogurt, without a thermometer. We heat the milk on low till it starts to steam, never letting it boil. Remove from the heat, and let it cool till you can stick your finger in and leave it there for 8 seconds. At that time I add the starter. I then put it in a quart size mason jar, and wrap it in a down comforter overnight. In the morning I refrigerate it, and once cooled, strain it through a coffee filter in a colander (hanging over a large bowl). Perfect yogurt every time. Love the quality that I control, and saving money.
Thanks for sharing your experiences with us, Linda! So happy you’re saving money and enjoying making your own yogurt. 🙂
I seem to have a problem with yogurt,it didn’t thicken overnight,its very liquid consistency.going to leave it in a tad bit more.
Sorry, Yvonne. 🙁 Did leaving it in the oven help it thicken? Does your oven have a “proof” setting that you could use to keep the oven consistently warm overnight? I hope you have better results with your next batch.
Question in the last step of straining the yogurt:
After the first strain through cheesecloth, it says to put the bowl back in the fridge and then restrain. Do you pour the yogurt that has been strained back into the bowl, after dummping the whey, and then re-strain through the same cheesecloth or do you need to line the strainer with a new set of cheesecloth?
Lauren,
I just pour the whey out of the bowl but leave the yogurt in the cheesecloth-lined strainer. Then put the whole set-up back in the fridge, where some more of the liquid will drain off into the bowl. Hope this helps, and good luck!
this recipe is so good it helped me heaps good job!!!
Hurray! Thanks, Rachel.
this may sound silly, but how do we know if the yogurt culture is alive?
Alexandra,
Remember that high school teacher who declared “there are no silly questions, only silly teachers!” or something to that effect? Anyway, I tried to find a definitive answer to your question and I came up with these two facts:
1. The cultures in homemade yogurt are probably much more “live” that those in commercial yogurt that has been sitting on a grocer’s shelf.
2. The active culture stays live for about two weeks, so the sooner you eat the yogurt, the better.
Hope this helps!
xo
I was interested in making my own yogurt and found your site. WONDERFUL!! Followed your directions and now have a beautiful container of homemade yogurt that I can control what else goes in it. I used Stonyfield 2% organic milk (could not find anything better in my area) and used the crock from my crockpot to let it sit in once it came off the stovetop. My oven has a “proof” button so I used that without the towel and it kept it at the right temperature. 8 hours later I had yogurt. Thank you very much for posting the information you did. It made it much easier for me to understand and do. 🙂
Linda,
I’m so glad the recipe worked for you!
🙂
Wow, this is a long blog about yoghurt!
I’ve been making my own yoghurt for some time now with great success and little variation from batch to batch. I use something called any ‘Easiyo’ which I bought for a couple of dollars from a charity shop, but even new they cost less than $20. It’s basically just a wide-throated plastic thermos with a frame to hold a jar inside. It makes 1 litre (about a quart) of unstrained yoghurt and has been designed so that the given amount of boiling water (1.1 litres)poured into the outer container and the amount of milk in the jar (which is only immersed about two inches) balance to hold the temperature at a pretty precise figure for the necessary time.
The Easiyo system expects you to buy their fruit-flavoured (and sugared) packs of milk powder and starter culture for each batch, but, like everyone else here, I use my favorite live culture yoghurt as a starter and then reuse my yoghurt as a starter for five our six batches before I buy a new lot.
I’ve used all sorts of milk but always pasturised or ultra-pasturised and I NEVER heat the milk apart from in the hot water bath. I simply pour room-temperature milk into the jar, add the mother culture, put the jar into the boiling water inside the insulated container, and leave it for six hours. Then I refrigerate it.
I find that the yoghurt gets thicker in the refrigerator so I do this before straining to the required thickness. To strain I use a piece of well-washed fine weave cotton (sheet) placed inside a sieve over a jug. I turn a flap of spare clothe over the top to avoid microbial or fungal contamination. Afterwards I hand-wash the cloth in dishwash detergent, rinse it in weak vinegar then water and hang it in the sun to re-energise 😉
I don’t believe that heating the milk to 180° is necessary with pasturized milk. I sterilize my containers and utensils, but the milk has already been sterilized by pasturization. In my experience, heating the milk doesn’t change the consistency or taste of the final product in any way.
If I’m feeling too poor to remember the ethics of exploiting dairy farmers and their already exploited cows, I buy the cheapest long-life (ultra-pasturized) supermarket milk I can find, and unfailingly get great results – very annoying. The only ‘failure’ I have had was using the best quality milk available to me – organic, full-cream, biodynamic milk from Jersey cows – the full monte. It was also non-homogonised, so all those tiny natural globules of milk fat resulted in a grainy textured yoghurt.
Chance,
Thank you for taking the time to put all of these thoughts into writing, and it’s great to hear about your methods and results.
xo
Hi, I just made my first greek yogurt and it turned out pretty good in texture but with a tiny acid flavor, whatc could go wrong?It was 12 hours inside a box which was inside another box(i put cartoon newspaper and things like that in between the boxes I covered everything with a big blanket and put it inside the oven, (but turned off)
Hi, Magali,
It’s hard to say, and it sounds like you took many steps to keep the temperature consistent. Did you preheat the oven a bit and leave your oven light on? Differences in milk can also cause variations in taste, so you might experiment with a different brand. You could also add a little nonfat dried milk to increase the protein level in the yogurt which might help it be less acidic. Good luck and let us know how your next batch turns out!
Thank you for taking the time to share this recipe Eliza. My son and I LOVE Greek yogurt and, as everyone else has mentioned, it’s quite the expensive habit.
I’m slowly getting into the ‘make it yourself’ lifestyle making our rice milk and other staples. I can’t wait to give this recipe a try!
Will let you know how it turns out 🙂
It worked! My first batch came out perfect!
To share my experience for the next person, I heated the milk on the stove in a pot, stirring constantly, and reached 180 in about 45 minutes. Left in an open wide casserole dish, the milk cooled to 110 in less than 30 minutes.
I left it in the oven for just over 8 hours and it came out with a nice consistency (though next time I will leave it in for 9 hours to make it a little thicker).
Cooled for over 6 hours (was out running errands) and then strained for an hour using a bowl, a regular colander and a thin (clean!) t-shirt (tip from another make your own greek yogurt recipe).
This batch came out great though I will try for a slightly thicker consistency next time.
Thanks so much for sharing this wonderful recipe Eliza!
I’m so glad the recipe worked for you, Victoria!
xo,
Eliza
i have made yogurt for years and have found a tablespoon or two of dry milk powder will make it thick and creamy without the straining stage. Straining, while a good way to thicken, lessens the quantity of your batch.
Great tip, Emma – thanks for sharing it!
Thanks for your great recipe. Two questions, have you tried making yogurt with goats milk? Have you ever used a small amount of sugar in the mixture? I’ve seen other recipes where they added a teaspoon of sugar.
Gina,
I haven’t tried making goat’s milk yogurt, but our friends at Everything Goat Milk have and they’ve provided an easy goat milk yogurt recipe. I’m not sure about the sugar, either, but if you try it will you let us know how it turns out?
xo
Eliza
Goat’s milk works fine!
When I was pregnant, I read that goat’s milk yogurt is the “perfect” food for a pregnant woman.
I made my own and ate it with fresh fruit throughout my pregnancy.
My “baby” is now 34 years old and I’m making yogurt for my grandchildren!
Thank you so much! I can’t wait to try this. Adding to my list of things to learn to make. Very exciting because I love yogurt!
Good luck, Alisha! Let us know how it turns out.
xo
I had found another site, but it wasn’t as easy as yours. I make 1-2 batches of Greek Yogurt a week, and I prefer the Organic milk although regular Pasturized milk works well, too. I do rinse out my cheesecloth, hang it over my shower rod to dry and use it again and again. I got a package at WalMart and have only used 1/2 of the package. Thank you for a great way to make Homemade Greek Yogurt!
I appreciate your sharing your own results and method, Mary – great to know about the cheesecloth!
Be careful reusing cheesecloth, which is not really meant for multiple usage. You are feeding an environment primed for bacteria growth, mould/mildew, etc. since you are not using soap and are additionally using sugars
***I recommend everyone invest in MUSLIN instead of cheesecloth, which is meant to be reused and is machine-washable; just toss in with the rest of your laundry. Muslin lasts for years, is relatively inexpensive and is safe and easy to care for. Easier and cheaper for you and better for the environment; the muslin I use is even organic!
Muslin is sold for making light clothing, theatre backdrops, etc. and can also be bought online. I’m using Eliza’s recipe (merci!) and the following organic bags ($10 for 3 bags) because you can use the drawstring to hang from the faucet or a nail or wherever for straining the yoghurt & 1 bag hold the exact amount. PERFECT!
(http://www.amazon.com/gp/product/B004UIWBEG/ref=oh_details_o02_s01_i00)
Coffee filters work well for straining yogurt. If you can obtain some comercial size filters, even better.
Great idea, Dinajoy – thank you!
xo
I just tried your method this weekend – WOW – can’t believe how great it turned out. It was tart, but added a bit of vanilla and some honey. One child tried it and loved it – hope to get all hooked.
Can you speak to the issue of tartness – what causes, how to minimize?
Suzanne,
Great question. I always follow this recipe exactly, and yet sometimes the yogurt is mild and creamy while other times it’s more tart. I don’t have any science to back this up, but I suspect it’s related to the age of the milk. I think this because I’ve noticed my homemade yogurt gets a little more tart each day it’s stored in the refrigerator. If it get too tart, I add a little honey to balance the flavors and it’s quite good.
Hope this helps, and thanks for your comment!
I tried the suggestion that you don’t have to heat the milk to 180 degrees. But the yogurt didn’t turn out as thick even though I followed the rest of the steps to a T. Also, I found that although cheesecloth can be reused, I find that it lets through some of the yogurt after 3 uses. I’m sticking to your wonderful recipe and following the steps exactly as you say from here on out!
Thanks for your comments, Mary, and I’m glad the recipe works for you. It’s great to know you’re successfully re-using your cheesecloth, too!
xo
Great instructions and easy to follow! Worked like a charm! Thanks.
Marc,
Thanks so much for sharing your positive report – so glad you’re happy with the recipe!
E.
I’ve been making yogart for sometime now. One thing I have found is that the yogart doesn’t like to be moved around while it is incubating. I generally put mine near the wood burning stove (not on the stove) and it comes out great everytime
Thanks for sharing this, Claudia – a great tip, especially for people tapping into the warmth of a wood-burning stove.
I have made 4 batches in a row and they have all gone bad, very lumpy. I have made this yogurt many times with great success, but I cannot figure out what I am doing wrong now. Any ideas would be greatly appreciated.
Patricia
How disappointing, Patricia! I’m sorry. 🙁 Since you’ve had success with the recipe in the past, I think the problem either has to lie with the milk (can you try a different brand or store?) or maybe the oven temperature — can you check if it’s heating accurately with an oven thermometer?
What I have been doing in the past is leaving it in the pot too cool down instead of pouring it into a bowl. Could this be the problem?
You may be right. I’ve read that the yogurt doesn’t like to be “disturbed” once the incubation starts, so next time try pouring it in the dish to cool and hopefully you’ll have good results. Good luck!
Good news! found out it was the milk that was the problem. Changed brands and now have success again.
Hurray! I’m so glad you had success. xo
thanks for the tip on not going overboard with the starter yogurt, mine is always so watery before I strain it…. I thought the more I used the thicker it would be….
THANK YOU!!!!
I’m glad that tip was helpful, Pam. Thanks so much!
xo
Thank you so much for sharing this simple easy to follow recipe. Trying it tonight after a friend share some of their home Greek style yogurt. It was delicious. Hope mine turns out good.
Good luck, Susan! Let us know how it turns out.
xo
hello. I made this yesterday night and and did everything but replaced the milk with soy milk and place it into a homemade warm water incubator, but when i opened it this morning, approx 12 hours, the whole thing completely separated! About 300ml of yellow clear liquid at the bottom and a whole curd of totally holey piece at the top, like a very wet bread batter. It smelled okay, but looks absolutely weird and i just put it into the fridge… Any advice?
That must have been disappointing. Because soy protein is so different from milk protein, you need to use a different recipe if you’re making yogurt with soy milk, like this one: http://www.bryannaclarkgrogan.com/page/page/1999382.htm
Good luck!
Why couldn’t the person who is dairy intolerant use almond milk or rice milk? Wouldn’t have to give up yogurt….I came across your recipe for greek yogurt while seaching the web to find out why greek yogurt had so much more protein in it than regular.
I also have a protein drink from FirstFitness Nutrition that I am going to try to make yogurt with. I am really excited to taste the results.
I am cooling down my yogurt right now, and I can’t wait to wake up in the am to taste it:)
My family likes vanilla flavored yogurt with a sweetness to it. I don’t have vanilla paste, but I do have pure vanilla from Trader Joes. Can I add this and a little sugar with the yogurt starter?
Regina,
I would add the vanilla paste and sweetener to the final product, not to the starter. I’d be worried that the sugar, especially, would interfere with the process. Hope this helps, and I’m glad your yogurt was successful!
xo,
Eliza
I attempted the first time to make it and nothing happened and then I noticed that the yogurt was at the bottom of the bowl after 8 hours and since the milk had not turned sour and used the same milk the next day and really mixed it well with the yogurt mix and it turned out amazing. I put frozen fruit, Splenda and a little SF blueberry sauce in my little container to bring to work today and am so looking forward to this. I am supposed to lose my 10 year job next Friday and this will help me so much. Thanks for such an awesome site. Rae
Quick question: If I dont strain the yogurt with the cheesecloth, will it still be considered GREEK yogurt.
Alicia,
If you don’t strain the mixture, then it’s considered regular yogurt – which is still fabulous! I make it both ways. xo
Thank you for this recipe, I found it the most informative recipe of the ones I looked up. Here’s a tip for folks making yogurt for the first time: heat up water and attempt to keep it 110 degrees for 8 hours before you try it with milk. My first batch wasted the milk, because my oven did not keep it warm enough. After that, I heated up three separate batches of water and tried 3 alternate methods for keeping the water at 110 degrees (crockpot, heating pad, and thermos). In this way, I was able to discover that for me only the thermos reliably kept the water at a consistent temperature. Today, I was able to successfully use your recipe to make yogurt — if I had done the water test beforehand, I wouldn’t have wasted any ingredients. But if I hadn’t, I would have wasted 2 more batches because the idea of the thermos came to me only after the crockpot and the heating pad also failed. Hope this helps some folks save them a first time failure! Thanks again for the detailed instructions!
Meadow, this is a REALLY helpful idea! Thanks for sharing your experiences, and I’m glad the thermos worked for you. xo
this came out FANTASTIC, thanks so much for the recipe!! The lowest my oven would go to is 170 degrees, so that’s what I heated it to. I got a little nervous about my oven staying warm enough, so after an hour and half, i did turn the oven back on to 170 for just a minute, and turned it off again.
I kept it in the oven for 7.5 hours and used 2 1/2 TBLS of plain yogurt as the starter and regular skim milk. After straining according to the recipe, it came out thick and creamy, hubby and I are VERY happy with the results!
Thanks for the recipe. I’ve made this twice now and the first time i let it strain too long (only an hour) and it resembled cottage cheese. I had to add about a cup of milk back in just to make it creamy. It was nice a thick but only created about 2 cups of greek yogurt which wasn’t worth it considering the time and that i had used organic milk which is about $4 for a 1/2 gallon by me. I made it again this week and used store brand milk at about $2 but this time i didn’t drain it long enough (maybe 15-20 minutes) and it still resembled regular yogurt. I use a yogurt-cheese bag rather than a cheesecloth which is super fine (explains why one hour the first time gave me cheese). I also think it’s not setting up firm enough. The first time i didn’t refrigerate it at all but this time it was in the fridge for 10 hours (i was at work). I have an old gas oven with no light and my warm setting runs between 150 and 175. When my oven is off it runs between 70 and 80 degrees. Do you have any suggestions as to how i can create a firmer yogurt? Both times in was incubating for 8-9 hours.
I have no oven light, btw. Forgot to mention that.
Dear Lisa,
I have a feeling the temperature is what’s causing your yogurt to be inconsistent. Do you have an insulated cooler? If so, you could fill that with bottles of very hot water to surround the yogurt container while it’s incubating. Some people have successfully put the container on a heating pad set on “low,” covered it with the towel and let it incubate that way, so you might experiment. Another suggestion would be to add 1/4 cup of dried powdered milk to the 1/2 gallon of milk before you start cooking it. This will add a little more protein, which can help thicken the yogurt. I was also wondering if your stove has a burned-out lightbulb that you could replace, but that’s probably a long shot. Good luck and I hope you find the set-up that works for you and produces better results. xo
Great method – so simple! I started making Greek yogurt in February; my son and I eat between 3 and 4 quarts each week made from 1% or 2% milk. I have a YoGourmet yogurt maker that I received as a gift, but will share this method with my daughter.
My yogurt maker came with a straining bag made from unbleached muslin. This can be reused pretty much forever, I think! Lisa C., if you strain too much whey off, couldn’t you just add it back? When I let a batch strain “too long”, I just added a little salt and pepper and used it as a vegetable dip. Think home-made ricotta! YUM!
Great ideas, Becky! Thank you so much for sharing the dip suggestion, too. xoxo
After reading these posts, I couldn’t leave without a compliment to Eliza; what a darling she is, I think I’m in love…… oops.
I use the “Fage” brand because it is the only one with Bifida, supposedly the best for you. I make two gallons at a time and after 18 gallons of success, I am very happy with the whole process. For filtering the whey, use a white dinner napkin or pillow case material works well. I like it thick so I will occasionally scrape the thicker yogurt from the material so more whey can pass through. bottom with a pancake flipper to let more whey go through. I estimate that in 2 days the volume reduces about 50%. Eliza, keep doing whatever it is that makes you so sweet!
Flattery will get you everywhere – ha! Thanks for sharing your tips, too, Lance. Hugzzzz…..xo
This is delicious! I have made yogurt for years with a commercial yogurt maker, one of those 1970’s style Saltons. I have heard of Greek style so I found this and gave it a try. I had planned carefully and then got called to work unexpectedly. After 7 hours I checked it and it was very runny so I thought,’eh, I’ll just leave it.’ Well, after 18 hours(!) I was able to continue with the recipe and it was the BEST ever!!! The 2nd batch I left in for 14 and drained more whey off than the 1st batch. Still good but not as. I’m continuing to experiment with this, I just checked mine after 12 and decided to drain the whey off but found that it was still very runny so I poured it back into the dish and it’s in the oven now. I’m just hoping to find the perfect balance of incubating and straining. I never flavor it, just add fresh fruit and granola. This is so easy, thanks!!
Good luck, Haileybub. I do think it takes some experimentation to find out exactly what method works. Thanks so much for sharing your experiences. xo
I am Greek and grew up in Chicago. The school I went to belonged to the church and was right next to the church. Half of the day in Greek and half in English. When my mother made Yogurt she always would use a white pillow case. In the last part of making her yogurt she would pour it in the pillow case and let drip over the sink. My mother learned from her mother and so on. I visited a relative in a small village in Greece and that is how she made her yogurt and she made yogurt every day. My favorite Yogurt is Fage and I am eating some now. FYI. Fage is the Greek word for eat. I have pleasant memories of sitting on the balcony i Athens eating Fage yogurt.
Thanks for sharing your memories, Samantha! xo
The recipe works but whenever i try to use the result as a starter for the next batch it doesnt turn out. Not sure why. Any ideas?
Cass, you might try freezing a little of the yogurt when you first make it, and then thawing right before adding it to the next batch. The only thing I can guess is that the cultures aren’t robust enough when added to the next batch for some reason.
Totally delicious! I used a stainless pot to heat the 2 percent milk, let it cool to 110 degrees and THEN put in the Activia yogurt and set it into an igloo cooler to rest overnight. Used a wire meat thermometer and by morning the temp was at 98 degrees. Comes out as thick as cream cheese. Yummy
I’m glad the cooler method worked for you Joaquin. Thanks for your comment! xo
I’ve been so excited to try this recipe… Just made it last night and the result is lovely! Still need to strain it, though I may just pour the whey off from the top and see if it’s thick enough. I didn’t have a thermometer but searched the ‘net for a few ideas as well as read all the comments to this post. Such a simple way to make yogurt! We’ve been eating tons of it lately so this will definitely save us some cash at the grocery store.
Thanks for the great recipe Eliza!
Thanks for taking the time to post your comment and let us know about your success with the recipe – makes me happy. 🙂
The yogurt making method worked GREAT!
Thanks very much! I posted your link on my LiveJournal Community ‘Frugal_Kitchen’, to spread the word.
Thank you so much, Cathy! I’m so glad this recipe worked for you. xo
Worked out great for me! I wasn’t thinking about how you wouldn’t get a 1/2 gallon of yogurt from a 1/2 gallon of milk, though. Either way, it turned out great and it is a heck of a lot more frugal doing the work yourself.
Hi, I, too, make my own yogurt occasionally using the slow cooker method. To make greek-style yogurt, I strain the finished yogurt using a coffee paper filter. I place a coffee paper filter over the holes on a steamer casserole, then pour my yogurt on it. The whey will drip to the bottom casserole. I usually do it overnight in the fridge. By morning I have a thick yogurt. You can always add back some of the whey if it is too thick for your liking or you can make yogurt cheese with thick yogurt. If you don’t like to cook, pickle, make shakes or bake with whey (high in protein), you can fertilize your acid loving plants like roses with it by mixing it with water. There’s a lot of uses of whey it you look it up in the internet. Don’t throw it out.
Thanks so much for these tips about using whey, Laiza. I freeze the leftover whey and add it to the dough when I make homemade pizza.
I just wanted to let you know that I’ve made this 4 times already, and had success EVERY single time. Thank you for developing a recipe that is easy to follow and doesn’t require special equipment.
For straining, I use birdseye cloth diapers (Gerber). They are thicker than what passes as cheesecloth in stores now, and handle washing well so they can be used over and over.
Can anyone tell me how to calculate the nutrition information for this yogurt? I plan to use 2% organic milk and Fage Total 2% as my starter. Would it be the same as what Fage lists on their Nutrition Facts panel on the yogurt cup? I use calorie tracking software so I want to be as accurate as possible, especially regarding the calories and protein content. Also, what is the best container for storing the completed yogurt?
I think you’d be pretty safe using the nutrition information from the Fage 2%, since you’re making your own yogurt with 2% milk. The variable is how much whey you end up straining out, but I bet it would be very close. I like to store the finished yogurt in a glass or ceramic dish with a tight-fitting lid. Good luck, and let us know how your yogurt turns out! 🙂
This was very successful for me, thanks! I put my bowl in an insulated shopping bag with a couple of mason jars filled with water (my bowl too wide for cooler and didn’t feel comfortable leaving oven light on). Since I’d started late in the evening and wasn’t going to be getting 8 hrs suggested time (for my sleep or the yogurt), in the morning I placed the bowl in the oven set at 150C and the culture worked its’ magic while I enjoyed my coffee 🙂 So maybe five hours in the bag and 45mins in the oven.
Placed it in the fridge before going to work; came home, strained thru 2 layers of cheesecloth (ran out) and am so pleased with the end result.
Now if I can doctor it up to taste like Greek Gods Honey Yogurt I will be tickled!
Julia, thanks for letting us know how you made up for the shortened time. I’ll have to remember that tip! xo
I’ve used this recipe 5 times and it has turned out consistently good. I’m so excited since it saves me so much money to make it myself! Thanks for posting this recipe!
Eliza,
I prefer a tangy yogurt, what can I do different to make it so?
Thanks
Steve
I came across your recipe and decided to give a try. I live in China now and Greek yoghurt is not readily available at the supermarkets. I didn’t have a candy thermometer but decided to take the milk off boil when bubbles started to appear at the sides. I followed your exact instructions and blanketed my bowl of milk with a warming pad. Success! Thank you so much.
Thanks for the awesome recipe. I just wanted to add that I used a small cooler (the type people use for lunch) as an incubator and it worked too. I’ve been wondering, if yogurt production has been dated back to 2000 BCE, how did those ancient cultures (lol) make it? Warming the milk is easy enough with a pot and fire, but it’s the incubation that gets me. Perhaps it was originally a way to preserve milk during the warm months of the year, in which case they could have left it out in the sun? Any low-tech ideas of how this could have been achieved?
Loved your detailed instructions & pictures – thanks! Also loved reading everyone’s experiences with the process & their helpful hints, so I thought I’d throw in my two-cents worth!! Since I didn’t have any good glass or ceramic bowls with lids, i splurged on a new glass 2 qt .measuring bowl (Anchor Hocking – oven & microwave safe) with a heavy plastic tight-fitting lid that was fine in the oven-incubation process. It was great to only use 1 bowl for the whole procedure!!
Because I started making this later than planned (9pm), I didn’t want to spend a long time time stirring & then cooling down ( maybe 2 hrs., according to some comments.) So I opted out for heating it in the microwave to 180 ( mine took abt 20 min. – but some microwave brands differ in cooking time) Then I put the bowl straight into a sink with cool water covering just the lower part of the bowl & it cooled down to 110 really fast – maybe 10-15min. I also added 1/3 cup of dry milk to the recipe to increase the protein content. The pre-heating & oven –
light method worked just fine for me. After cooling down in the fridge for 3 hrs.
I stirred some of the liquid whey that had collected back into they yogurt before I strained it for greek-style yogurt. Was that okay to stir in the whey ?- it seemed to come out fine. Again, thanks for all the info – it was easy , fast & fun to make & of course – delicious!
One more FYI that might be helpful to your readers. I just found out that I am allergic to whey products -cow’s milk, cottage cheese, yogurt, whipped cream etc. – all the good & familiar things I was used to eating!! I was especially missing my greek-style yogurt since it is such a easy go-to food with lots of protein when you’re on the run or want a quick meal or snack. So, after complaining to my doctor, he said that if I made my own homemade yogurt, the heating process would denature the protein molecules & it would be “digested” before I even ate it- or something to that effect!! I’m hoping this will work for me, because sheep & goat’s milk yogurt is even more expensive than greek yogurt & I can only find it at Whole Foods. Also if you find out that you’re allergic to whey (milk) products, you could possibly be allergic to gluten (wheat) products as well, because the protein molecules are very similar in both. Check it our with your doctor!! Happy cooking & eating to all!!!
Where I live, it’s 110-120 degrees outside during the day. Can I just put the mixture outside instead of trying to get the oven temp just right?
Thanks so much for your recipe!
Hmmm, tricky question. My hunch is that you’d be better off to use one of the techniques above to keep the temperature consistent. Stay cool and thanks for getting in touch.
Oh no! I hated reading that update you had. I have a problem. My oven (that I’ve had for only a couple of years) doesn’t go below 170°. Can you believe that? Our litigious society is a disgrace. :(((
Do you have any suggestions? I suppose I could test the temp in my slow cooker (for the “keep warm” setting), but other than that I don’t have a way of keeping it at such a low temperature unless you have a good idea.
I have totally forgotten to warm the oven before putting the bowl in it. Leaving the light on seemed to be enough. Check the temp of the oven when the light is on. OR, heat it to the minimum temp, and then let it cool off a bit before putting the bowl in.
Hi, do you know how to make cultured Kefir yogurt ?
Scotty,
I haven’t made Kefir, but Tammy over at Tammy’s Recipes has a recipe and a video tutorial:
http://www.tammysrecipes.com/about_kefir
Good luck!
Thank you so much for the recipe. I don’t do this because of any cost savings. I do this because…
#1) MOST IMPORTANT: It keeps me from purchasing 52 plastic containers a year!!!!
#2) I can choose what milk to use for my yogurt (I prefer grass fed non-fat milk)
#3) I can choose how (NOT) tangy my yogurt will taste #4) It is fun to make something that most people wouldn’t think of making themselves. 🙂
Hurray! I’m so glad you’re happy with the recipe, Angie. Hugzzzz
Can the recipe be doubled?
Yes, I know the recipe can be doubled because I halved the original recipe. xo
For Magnoliasouth – About your comment on your oven temp. –
If I read the directions corretly, you just have to heat the oven to about 170. After your oven has reached 170, turn off the oven, & open it for a bit to cool down to 150. Then turn on the oven light ( if your oven is new, it should have a workable oven light ), and put your towel wrapped ,covered bowl of milk-yogurt mixture & let it “bake” overnight or for 8 hours. It’s worked for me this way. Hope this helps with your circumstances!!
I was wondering about using whole raw organic cows’ milk. Any thoughts on that?
I haven’t had the pleasure of trying it, but my hunch is that yogurt made from whole raw organic milk would be DELISH. 🙂 If you try it, will you let us know how it turns out?
xo
I had one unsuccessful try with another recipe. Now tried yours and it looks way better. I will be having it for breakfast tomorrow morning. I wanted it to be really thick and it seems I achieved this. It is still dropping whey (1 Liter already from a batch made with 2 liters of milk). The organic milk and the “bioghurt” I used seem to be the difference from my first try. Also the towel covering it to keep it warm. 🙂
Vane, I’m so glad the recipe worked for you! 🙂
Did you know that if you leave the yogurt on your kitchen counter for 3 or 4 hours you get homemade cream cheese? Its an excellent source of probiotic cultures and has a nice tangy taste. Just let your Greek yogurt sit longer! Great recipe! Thanks. 🙂
This is a great recipe, Eliza! I followed your instructions and it came out great. It tastes and looks like whip cream and needs no sugar it is so creamy and rich! Thanks for the fantastic, detailed instructions!
Thanks so much for letting me know that you had success with the recipe, Denise. Hurray! xo
Just a question… can you use lactaid milk?
Thanks in Advance
Thanks for the recipe, I tried it yesterday and I’ve just enjoyed my first batch. I used to make yogurt years ago with a salton yogurt maker. This was so easy. I also didn’t want bother with cheesecloth, so I used sheer curtains. Worked great. I boiled them first in some water with baking soda and dried them overnight. I even shared some whey with my dog Hoover and she loved it!
The whey is a pricless “leftover”..I have made yogurt just to get the whey off of it to use in making homemade kimchi & sauerkraut. It is even more nutritious than the yogurt. NEVER discard it!
I make my own yogurt and use my food dehydrator. It has a special adapter ring to accommodate taller containers. I set my dehydrator to 135f. When I awake 7 hours later its thick and creamy. I have attempted setting the yogurt for only 4 hours and this has worked too. With refrigeration, it thickens further. Cheesecloth is meant to be doubled or tripled for culinary usage. Don’t forget to wet prior to using. And rinse with baking soda and hot water. Thanks for clarifying Greek yogurt is not a particular milk. It’s truly a style.
I didn’t read the long list of comments. It just seems you’re working too hard. Put quart jars in your sink when you begin making the yogurt. Fill with hot water. When you have added the culture to the cooled milk, empty the jars of the water and pour the milk mixture into them and cover with lids. Take a cooler, add very warm water to about half the height of the jars and place jars in water. Close cooler and walk away. Now, while your yogurt sets, you can bake!!!
Thanks for the great recipe – we eat quarts of Greek Yogurt every week. Can I use powdered notfat milk in this recipe? With the anticipated rise in diry prices I was consideeing laying in a store of nonfat milk prior to the looming increase.
Hi, Christiane,
I haven’t tried making yogurt with dried milk, but here’s what our fellow blogger Hillbilly Housewife recommends:
“When making yogurt with powdered milk, it is good to use more dry milk powder than you would to just make fluid milk. For instance, normally I would use 1 1/3 cups of dry milk powder to make a quart of milk. When I reconstitute milk for yogurt, I add an extra 1/3 cup of dry milk powder, using 1-2/3 cups of dry milk powder for a quart of yogurt.”
Good luck!
I was beginning to wonder if anyone else used powdered milk. Actually, that’s all I’ve ever used. And I too, add extra powder milk. Years ago when my 4 children were young and loved yogurt and GrapeNuts ( waaay before it was popular) I use to make yogurt by the quarts. I used a food dehydrator, which held 5 qt, jars. I heated water in the microwave to desired temp then mixed in the milk powder and then starter. I would use 2 to 3 tbls. Fill the jars to within an inch of top. Place one tray on dehydrator on which to place the jars. Then invert tray over the top of the jars. Plug in and then check when you get up in the morning. Now, that I live by myself I use a small 7 jar yogurt maker. I am now eager to try the Greek-style yogurt.
After my milk has cooled to 40-49C and I’ve mixed in my starter,I just leave the milk in my stainless steel pot, set the pot on one of those bags you heat in the microwave for 2 minutes (for sore muscles, etc), wrap the entire schmoz in a space blanket and let it sit undisturbed overnight. In the morning it is done. Remember to heat your Magic Bag for 2 minutes. A space blanket is one of those very thin, shiny foil things you can find in a first aid kit to wrap shock victims in or you can use it camping or to put on windows to block the sun on a hot day. You can buy them very cheaply at a dollar store. I strain my yogurt all the next day in the fridge because I like it thicker. I also sweeten with honey and flavor with some pure vanilla.
In lieu of cheesecloth try paint strainers from local home supply store,(Home Depot) a synthetic mesh material with elastic top, easily washed and work better than cheesecloth.
I’ll have to check out the mesh strainers the next time I’m at the hardware store. Thanks!
I have been making my own yogurt (and greek yogurt) for a while now, and there are multiple ways to incubate your yogurt. The most important thing is keeping the yogurt at the proper temperature (105 – 115 F) for the 8 hours. I use a cooler with my yogurt divided up in ball jars, and I fill it with water at 120F, which is still above 110F after 8 hours.
Also for straining to greek yogurt, you can use any strainer you have, and line it with coffee filters. You just dampen the filters with water and overlap them in the strainer so that all of the holes are covered.
The next step after making your own greek yogurt is finding a use for the whey (greenish liquid) that comes off of the yogurt when you strain it into greek yogurt. There are many uses for it!
As for how long it will last, I sterilize the ball jars that the yogurt goes into, and the jars are not opened until the yogurt is used, so it has lasted me more than two weeks.
These are all great tips, Philip – thank you!
P.S. I like to use the whey in homemade pizza dough.
Thank you SO MUCH for this amazing recipe. I’ve spent a small fortune on store-bought Greek yogurt over the years and when I saw your post about making your own, I knew I just had to try it. I started my first batch last night and woke up to PERFECT yogurt this morning. Strained it and it is thick, creamy and absolutely delicious. You’ve changed my life! 🙂 Thank you!
Your comment made my day – so glad you’re happy with the recipe.
I really like your blog, I’m bookmarking it so I can easily visit it often. Thanks for the good instructions on the Greek style yogurt.
I make artisan cheese from my goat’s milk and cow’s milk from a dairy near me. I just wanted to let you and your readers know about a nifty way to strain the yogurt not using the very loosely woven type cheese cloth in the picture on your blog. I buy 100% cotton “flour sack” towels, or muslin from a fabric store. I use it for my cheese making and for yogurt. It’s less expensive than the cheese cloth in the grocery stores and works much better in my opinion.
Thanks for sharing that tip. I’m going to try muslin the next time I make yogurt.
I am going to try this recipe today IF I can source some cheesecloth here in Holland. I’m off to the shops on my trusty bike. Cross your fingers for me!
Cheers,
jb warren
PS. Thanks for the recipe. 😀
Fingers tightly crossed! 🙂
Hi, i tried your yogurt the last time and it was ok but more soupy than yogurty, it just wasn’t firm enough. This time i used Activia as a starter and heated the milk for 185 to 190 for 30 minutes. Between the two, longer heating time to “This denatures and unravels the whey protein, resulting in a thicker and less whey-y yogurt” and a yogurt with different cultures, it made a big difference. Mine came out about as thick as any commercial brand before refrigerating. I incubated the stove method. I combined your website and this website. Thanks so much.
http://concasse.blogspot.com/2011/01/homemade-yogurt-two-methods.html
I want to also add that i used 2% milk this time and last. Last time i used our local Wegmans store brand as a starter, which didn’t work so good, Activia this time made a difference in firmness. Who new? I figured a bacteria starter is the same as any other, wrong!
Thanks for sharing your helpful tips and experiences, John!
I haven’t tried the Greek version yet for homemade. We have been making yogurt for the past year with a yogurt maker. It is easy and efficient. We haven’t had any fail. You can even use powdered milk or freeze dried milk and it still turns out great. We are going to try straining it next time as I had Greek yogurt for the first time and love it. You can also use the whey in casseroles and cooking, not just in bread. It is supposed to be healthy too. I like to use homemade jam in mine for the sweet, and apple butter is an amazing flavor too!
Thanks for your tips about how to use whey, Pattyann. Apple butter with yogurt sounds yummy, too! 🙂
I tried this recipe step by step and I love it. I don’t use a thermometer because I don’t have one so I remove the pot from the stove once I see some bubbles. I set my oven to 170F (can’t go lower than that) and it still works. That’s it. No more buying yogurt. I’m making my own ( Tastes much better and I save money big time ) Many thanks for sharing, Eliza
I’m so glad the recipe worked for you, Max. Thanks for sharing your method, too.
Hi!
I made your yogurt and it turned out great! One concern I have is that I forgot and left it out for 19 hrs ( overnight)! Is it still okay? It looks and smells fine.
I also doubled the recipe and made a whole gallon.
Dear Lanie,
Since yogurt has been made for thousands of years in less-than-ideal conditions, my guess would be that your yogurt is fine. Here’s hoping it’s just wonderful, especially since you made a gallon! 🙂
xo,
Eliza
I try to make as much homemade food items that I can for my family, this is just one item that has never worked for me in the past as the consistency of the yogurt is ‘slimy’, not a good texture for me. I will give it another shot with your recipe. I hope it turns out well.
Good luck, Christa! Let us know how it turns out.
I am a mom trying to use less processed food for my boys, I also am slowly cutting all of the refined sugar out of our diets. Love that this is organic, and just wanted to let other mommies out there know if your kiddos like “go-gurt” you can make the long tubes with a simple vacuum sealer and the bags that come with it. I blend my yogurt with fresh local berries, package it in the tubes and freeze. Perfect for lunches.
I also use the vacuum sealed tubes to make “ice-pops” with organic fruit juice.
Lisa, thanks for these kid-friendly tips. I don’t have a vacuum sealer, but I’m sure our readers who do will love this idea.
got busy and left the yogurt warming 4 days. bitter as penicillan.is it safe to use as starter?
I wouldn’t take a chance, especially since it’s bitter. I hope you have better luck with the next batch. 🙂
xo
Eliza,
Thank you for this recipe! I made my first batch last Saturday and it turned out great. I have another batch cooling now. Since I eat greek yogurt everyday, this is going to be a real money saver.
Thank you sooo much for the recipe and all the wonderful encouragement from everyone’s comments!!! I finally made my first batch–used 2 cups whole organic ultra-p (all I could find), 1 cup organic heavy whipping cream (u-p, again), and three tbls Voskos’ plain yogurt–my oven wasn’t cooperative, so I put a large corning lasagna pan of HOT water on the shelf below–this morning I had yogurt that was the consistency of thick pudding, and tastes like a cross between whipped cream and creme cheese–not at all sour like commercial yogurt!!! I am one happy camper!!!
Your note makes me a happy camper, too! So glad you’re happy with the recipe.
I can’t wait to try this. As soon as I get to the store today to buy a yogurt to start it with. 🙂
My husband and I both have been successful in making the greek yogurt, and we love it. As a result we would like to start using 1-gal of milk, rather than the 1/2-gal on the recipe. Would you please confirm that the starter would be doubled, I would assume this is correct but wanted to ask to be sure, thank you!
Kady, yes – just double the recipe and it will work fine. I’m so glad you’re enjoying making Greek yogurt!
xo
My URL is e1.ij.net/pce3/introduction.asp
I disagree with leaving the lid off the milk during the hour it is set out to cool. while the milk may cool quicker due to evaporation it is just as easy to introduce bad as well as good bacteria. Once the milk cools below 140F deg. you are at risk of introducing several bacterias that the reason for pasteurizing is to eliminate in the first place.
I’m so glad that you posted how you turned the failed attempt into a success- I am making a batch right now, and it has been a few months since I’ve made any. I accidentally put the starter in as soon as I poured the hot milk into the bowl- so it was still 180. I figured too that the starter got killed, and while I was waiting to let the temp drop I found your comment. So glad I didn’t pour out the milk! I think it will work out just fine!
Thanks for sharing this recipe, Eliza. You’re lucky that you can buy organic milk at such a reasonable price in the States. One litre of organic milk costs me $5.69. I can buy Krema yogourt for cheaper, but I would still like to try making my own! You make it sound easy and painless 🙂
This is pretty awesome.. thanks
Eliza,
I’m about to make my very first batch of yogurt, and I’m very excited. But I have a question.
Greek yogurt is supposed to have more protein than regular yogurt, but if the difference in the two is subtracting fluid, how does the yogurt gain more protein?
Thanks for your time and website.
Michele
Hi, Michele,
When you strain out the whey to make Greek-style yogurt, the remaining protein in the yogurt gets more concentrated vs. regular yogurt. Hope that helps.
xo
Boil some milk.
Let it cool until you can put your hand in it.
Add 1-2% by weight of last week’s yogurt.
Cover it. Typically this was done outside during the day.
In the evening you will have yogurt.
Thank you so much for this recipe! I am on the last hour of straining, and WOW! It smells so great, I cannot describe it. Of course you know, LOL!! I am so thrilled that it worked exactly as described.
My husband is SO HAPPY about how much money we are saving, it’s tremendous!! Thank you again!!
Edie,
I’m so glad you are happy with the recipe. Good to hear your husband is pleased, too! 🙂
xo
I didn’t read all the posts, but I did want to add that you can use a coffee filter as well to reduce the whey content of the yogurt. I learned this several years ago from a greek recipe book that I bought in Greece. Before “Greek” yogurt arrived in stores, I had to reduce regular yogurt using a strainer and a coffee filter to make tsaziki.
Ed – thanks for this tip!
Hi, I am from India and have often wondered what is Greek yogurt. I read your recipe and found it very similar to the way we prepare it in India. In India we seldom buy yogurt from a super market. It’s mostly made at home the same way as you described. The only thing that we don’t do is the straining bit. It also takes a lot less time to set, India being a tropical country. Next time a recipe requires Greek yogurt I now know what to use. Thanks a lot
Ash, thanks for sharing your perspective from India – very interesting! xo
Can the whey be used to make ricotta like whey from cheeses can?
Before Greek yogurt became a buzzword, I always heard this called yogurt cheese.
I would absolutely love to try this recipe! Greek yogurt has become the new mayonaise for most recipes in our household. We spread it on sandwiches and even use it to make dill salad dressing…..
Anyway.. Is there a substitute for using the heating pad? We dont have one and I am not sure how to “pack” our ice cooler with hot jars. I am pretty sure the oven light does not give off heat either.
Any suggestions would be great because I really want to try this…
I was wondering if you have ever tried to make non dairy yogurt. Let’s say with either soy or almond milk and soy yogurt as base.
Thank you
Milena,
I haven’t made these types of yogurt yet, but our friends at Fiasco goat farm shared some specific tips about making soy milk yogurt in this post: https://fiascofarm.com/dairy/yogurt.htm
Good luck!
xoxo
Thank you so much for posting!! Mine turned out wonderful. My 7 year old kept calling it whipped cream (no matter how many times I reminded him it was just yogurt), he will only eat raw vegetables, and has been tiring of ranch dressing, but today he dipped his raw rolled up cabbage into the yogurt we made last night. So now we all have a new favorite veggie dip, it is mild enough to eat without sugar/seasoning. We replaced sour cream with plain yogurt last year and go through an expensive container too quickly. Now we can all eat and enjoy yogurt at a fraction of the cost.
I will use the leftover whey to make ricotta this time, but our chickens and dogs will love it too!
Nicole, I’m so glad the recipe worked for you — and especially happy to hear that your 7-year-old liked it! The vegetable dip idea is brilliant — thanks for sharing. xoxo
My first time to try this recipe. Can I just add any yogurt to the milk.Is it all active.Looking forward to trying the recipe. I have boughten yogurt that I will use. Thx Donna
Hi, Donna – look for the phrase “live cultures” on the yogurt container and you should be fine. xo
After researching many different methods, I decided yours was the simplest to follow and wow, I made the best homemade yogurt ever! The only time my batches didn’t turn out so well was when I deviated from your instructions! I did find that a milk temp of 115-110 works best for me. I also got some organic milk from a local dairy..just pasteurized, not “ultra” pasteurized and my recent batch came out so darn thick I didnt even have to strain it! I just poured off the whey. Amazing! I love this homemade yogurt. It’s not as tart as store bought..makes wonderful dips as well, and as you say, more economical and more healthful. Just pure, wonderful yogurt. I also love mine with honey. Thanks so much for these wonderful instructions!! Gratefully!
Brenda,
I’m so glad the recipe worked for you and turned out thick and delicious. Thanks so much for your note! 🙂
xo
Years ago when I made yogurt at home and strained it through cheesecloth, (I used coffee filters)it was simply called “yogurt cheese”. We even used purchased yogurt, probably Dannon. If we wanted it thicker, we strained it. It was still “yogurt cheese” But thanks for the recipe. Looks great!
My yogurt turned out great! I put it into clean mason jars, leaving room at the top for the yogurt to expand. I put the lids on the jars and put them into an insulated lunch bag large enough to accommodate the jars plus a jar of warm water to maintain the temperature. I waited 8 hours. And honestly, the waiting is the hardest part! It turned out really well, and not at all tart. I am really happy with the results! Thanks again for this recipe.
I used Stonyfield Organic Plain Fat-Free yogurt because that’s what I had on hand.
Carol – thanks for sharing your specific directions. I want to try this method next….sounds nice and easy! 🙂
this recipe sounds so simple … my only problem is my oven only goes down to 170, is that going to mess up my yogurt ??thank you
Christina B. My oven only goes down to 170 degrees F. I made yogurt by putting the oven on at 170 for about five minutes, shut it off, put a bowl of yogurt in oven covered with plastic wrap and you may wrap with a warm towel. Let it set overnight. This was the first time, in a long time I’ve made yogurt. In the morning, after about 8 hours, I turned on the oven to 170, waited 5 minutes, shut it off, put a pan of hot water in oven and returned the bowl of yogurt beside pan. I then left the house for several hours. I have yogurt!
Don’t know how ) missed this till now but i am SO EXCITED to try this!thank you for posting Eliza!
So glad you like the recipe! xoxo
Wow! This yogurt is so delightful!
I needed my oven for a roast, so I followed someone’s suggestion to use a cooler with several jars of hot water.
I filled up the jars with very hot water (put on the lids of course) , and then placed the yogurt bowl on top of the jars. I was concerned that the yogurt would not stay warm enough, but it turned out perfect.
Thank You!!
Thank you for sharing your experience, Sara, and I’m glad you were happy with the recipe. xoxo
I live in Canada and in winters I put my yogurt on the heating vent for 6-7 hours ,and in summer I put in on the patio if the day is hot, and it works beautifully.
What a great way to take advantage of free heat. Thanks for sharing this, Madhu. xo
I was heating my milk got it up to 170 degrees. Then the milk did something crazy and separated . Looks like curds and whey. What did I do wrong?
Dear Jeanie,
Oh, no! Sorry to hear this happened. My best guess would be that your thermometer is off a bit, because it sounds like the milk got too hot and curdled. You’ve probably seen the term “scald” in recipes that call for heating milk, which means to heat the milk until it’s almost, but not quite, simmering. A slightly lower temperature should do the trick, and I hope you have better results next time.
xoxo
I attempted to make this yogurt last night and followed all the steps to a T. When I checked on it this morning it was still liquid. I thought I messed up but had to get going so I just left it in the oven the rest of the day with the light on. When I check it this afternoon it was like yogurt. My question is: is it safe?? Is it really yogurt?? It had been in the oven for 14 hours…that can’t be safe to consume? What do you think? I don’t want to toss it if it is okay.
Thanks!
I had a similar experience with a batch of yogurt, and it thickened during the second try and was delicious. I told myself that people have been making yogurt for thousands of years in less-than-ideal conditions and it was probably fine. At the same time, I’d always err on the side of caution. If you have any doubts, your intuition is best.
You can use the whey you strain from the regular yogurt for any number of things and it is an active product that contains good bacteria (probiotics). You can make cultured veggies using the whey; you can make kefir soda with it; you can drink it. I put it or kefir on my dog’s food 2x/day as it is as good for him as it is for me. I’ve been making homemade yogurt for quite a long time and almost always strain off the whey to make greek yogurt. Very yummy and I know exactly what goes into it. I’ve used more starter than you propose, but I will try it with less and see how I like the different taste. Thanks for your website.
Jane, thank you for these wonderful ideas for using leftover whey. Sharing it with your dog is brilliant! I’ve been adding it to breakfast smoothies recently, too. xoxo
I wanted to make some with honey like the Greek Gods Greek Yogurt Honey. When do you suggest putting in the honey? I will have to experiment to find the right amount of honey.
Linda – I’d add the honey at the very end. That way it won’t interfere with the magic/science of milk transforming into creamy yogurt. This sounds so yummy! xoxo
Elize, I loved reading your article and the comment thread. I wanted to ask a question. If I use organic milk and a non organic starter (fage 2%) does that make the resulting yogurt organic or non organic or muddled?
Dear Asiya,
Since you’re only using such a small amount of non-organic FAGE, in my humble opinion your finished yogurt will be about 95% organic. Each batch you make after that will be more and more organic, until those tiny chemical molecules are long gone and you can proudly call your yogurt “organic!” without shame. 🙂
Eliza
Elize, I LOVE my kitchen toys. I purchased a Greek yogurt maker today that was marked down 90%. How exciting! Problem is it came without any directions or recipes. Can you tell me how to use your recipes using an electric Greek yogurt maker? Help! Please!
How exciting, Elaine! I don’t have experience with an electric yogurt maker, but you might get some answers from this post on the King Arthur Flour blog:
http://www.kingarthurflour.com/tips/yogurt-maker-tips.html
Good luck, and let us know how it turns out! xoxo
Have you heard of or tried using powdered psyllium husks to thicken yogurt? I have been experimenting with different kinds of dairy milk to learn the in’s and out’s of yogurt making, but my goal is to get away from dairy. I hear in goat milk yogurt and other kinds that thickeners are often needed to make it the “right” consistency (read any grocery label for evidence). Truth be told, I like my yogurt thick, not runny. If I have to chew it, all the better! However, I’m not a fan of carrageenan, xanthan gum, guar gum, and the like. They aren’t necessarily “bad” for you, but an additive is an additive and I’d like to get away from them. I use psyllium husks in gluten-free baking. They make FABULOUS pizza dough, way better than the xanthan gum versions I’ve made in the past. So I’m wondering if it would work for yogurt too. Ideas? Thoughts?
Dear Sarah,
I haven’t made yogurt from goat’s milk, nor have I used powdered psyllium husks to thicken yogurt. The one time my yogurt didn’t thicken properly (I wrote about my mishap at the end of the post above), I re-did the gentle heating process and it came out fine.
I did a little research, and this recipe for homemade goat’s milk yogurt suggests thickening it with gelatin or powdered milk if needed: http://www.yogurtfromhome.com/goat-milk-yogurt.html
Good luck, and let us know how it turns out!
xo,
Eliza
I made my yogurt but it is not white. It is light tan. It still tastes like greek yogurt with the exception of being very thick.
Hmm, that’s a good question. The only thing I can think of that would turn the mixture tan is cooking — did you notice the milk darkening a bit when you cooked it? Or might it have reacted with a pan, or a wooden spoon or other cooking utensil? I’m glad it tasted the way you expected, and if you solve this mystery I’d love to know what you discover. xo, Eliza
Is it possible to do this with Chocolate Milk rather than regular? I’ve been adding chocolate protein powder to my greek yogurt for a chocolate pudding like consistency but if I make it myself I might not need the protein powder for anything other than the protein.
thank you.
Dear Chris,
Yum! Yogurt made from chocolate milk sounds amazing. While I haven’t tried it, two things could create challenges. First, most chocolate milk has added sugar which could interfere with the thickening process. Second, most commercial chocolate milk has carrageenan added as a stabilizer and I’ve read it can cause the yogurt to separate. To be on the safe side, I’d probably whisk in some cocoa powder to the milk mixture and make the yogurt, and then taste and add a little organic coconut sugar or agave nectar if it’s too bitter. If you decide to experiment, will you let us know how it turns out? Thank you for an interesting question! -Eliza
Hi Eliza! I stumbled across your post when on a mission to eliminate those pesky yogurt containers from my life. My new city does not recycle that type of plastic. Thank you for your great instructions, no-fuss approach, and all the pictures. My yogurt is straining right now, and it does have a lovely, mild flavor. Success!
With regard to Organic Milk. Have you ever notice they add Vitamin D. It’s D3, actually. I look at all the cartons of Organic Milk, and all added Vitamin D3.
I contacted an Organic Milk company, asking why they add Vitamin D (they process natural Vitamin D through processing, and also due to leading us on as far as grass-fed is concerned.
Please pay particular attention as to the source of the Vitamin D3. I’m switching back to Raw Organic Grass-fed cows, no matter how far I must travel.
Thank you for contacting Organic Valley.
We add vitamin D to all Organic Valley fluid milks, with the exception of some specialty milk products. Vitamin D is naturally present in milk, but it can be low due to several factors like cow breed, seasonal exposure to sunlight, diet, and lactation. Our Vitamin D is made by processing a sterol derived from Lanolin (sheep wool). While this D3 is obtained from sheep, it is considered Kosher and pareve because the sheep are not slaughtered to obtain the wool.
If you prefer milk without added vitamins, you may like to try Organic Valley Whole Grassmilk, http://www.organicvalley.coop/products/milk/grassmilk/.
Thank you for your feedback, I have passed your comments along to the appropriate department.
If I can be of any additional assistance, please do not hesitate to contact me.
Regards,
Kandy B.
Organic Valley / Organic Prairie
Consumer Relations Associate
1-888-444-6455 ext. 3701
Just thought I say that after making yogurt many years the ‘other’ way, I tried your way and I love it.
glassy~
I didn’t read all the comments so I apologize if this has been asked before!
Ok, I thought the whole reason to heat milk to 185F was to kill off any bad bacteria (which I don’t understand because store bought milk has already been pasteurized) so why do you take out 2 Tbsp of the milk before it’s heated? I would think that defeats the reason you heat the milk. If it works great but this is the first time I have seen this. Other recipes that I have seen, at least 30 others, do not do this step. They just add the correct yogurt with live cultures.
can I use my large dehydrator that has a temp gauge in it? there is plenty of room if I remove the trays.
I have been making my own yogurt in my large oval croc pot that holds 1-gal+1qt. I mix 1%+2% milk. I cook on high for about 3 hrs until 180 degrees. Now cooling takes literally from 4 hours to 4.5 hrs to get back down to 110-115F. So plan your day I start my process at 1pm so by 830pm I am ready to add the starter and cover with my very thick beach towel. By 7AM the next morning I can see the yogurt has set. I put straight in the Frig and cool down over night to set even better. The NEXT day I scoop out and start putting in my prepared large colander with muslin cloth into a old stock pot that fits in the frig and the whey will drip and I discard throughout the day. I put a piece of wax paper on top with a plate. NOW when I see that its GREEK thickness I stop and pour that in my large glass bowl and whip with my whisk. PURE HEAVEN. Its so delicious you think you are eating vanilla ice cream. Very low fat all I used was a mix of 1 and 2 %. Now I make from all that my frozen yogurt and its the best you will ever eat! I have a 2 qt Cuisinart. I chill the bowl in the freezer over night and prepare 4 cups yogurt, 1/2 c sugar, 1 tablespoon vanilla and pinch of salt. In 20 min I have the richest creamiest delicious dessert !! add blueberries, fruit on top, get creative.
This recipe is perfectly creamy, delicious, simple! Just takes some patience. I used Ultra-Pasteurized, Grass Fed Whole Milk (Horizon) and Noosa Plain Yogurt as my starter. I was a little concerned when I took it out of the warm oven this morning as it was REALLY warm, but it was beautifully thick. Popped it the fridge for more than the 3 hours required as I was running my kids all over tarnation and finally strained it this afternoon. It’s beautifully thick and creamy and most definitely mild in flavor! Thanks Eliza!! A keeper for sure!
Keep up the wonderful work , I read few posts on this site and I think that your web site is very interesting and has lots of excellent info .
As a Newbie, I am permanently searching online for articles that can aid me. Thank you
Wow Eliza!
You are an amazing person! Thank you for the greek yogurt recipe!
Thank you! Thank you! Haven’t tried it yet, but will come back and rate after I have. I’ve been wanting to try making yogurt recently, and this looks doable!